Feb 16, 2024
For several years, pip and pip-tools have become distinguished in Python packaging
for their usability and ubiquity. Recently there has been some interesting new developments
in the realm of Python packaging tools. In a trend that started around 2022, there has been an
ongoing "Rustification" of Python tooling.
uv is designed as a drop-in replacement for pip and pip-tools, and is
ready for production use today in projects built around those workflows.
- Charlie Marsh, "uv: Python Packaging in Rust", https://astral.sh/blog/uv
First, Rye was released in pursuit of a "cargo for Python". Cargo is Rust's package manager. It seems to
have inspired Python developers to keep trying to improve on what we have with pip.
While this was happening, in secret Astral Software and Charlie Marsh were also working on yet another hybrid
Rust + Python package manager named uv. There's seemingly no end to this man and the Astral team's projects!
ruff quickly supplanted the incumbent Python linters to become a favorite among Python developers.
Could lightning strike twice for the creators of ruff? Seems they won't be a one-hit wonder when it
comes to developing hit Python packages.
Improving Python packaging is an audacious and challenging task. Part of the problem
is that out of the box Python installs can be tough to reason about for new Python developers,
not to mention the hassle of explaining the purpose of virtual environments in Python coding via venv.
One perk of uv is that it includes virtual environments in its workflow.
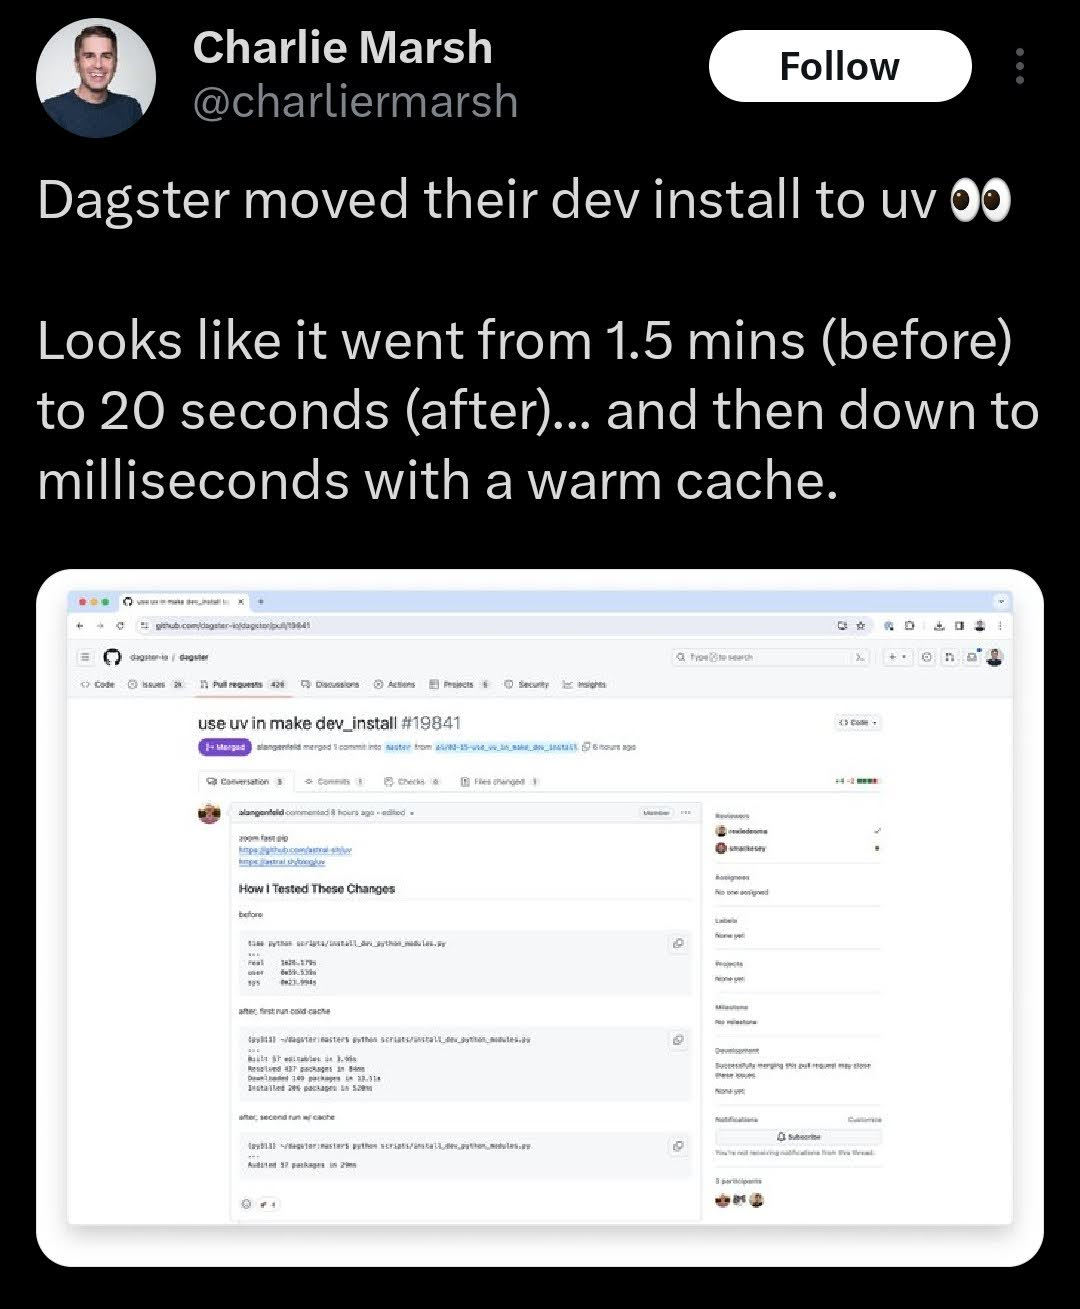
uv is 8-10x faster than pip and pip-tools without caching, and 80-115x faster
when running with a warm cache
- Charlie Marsh, "uv: Python Packaging in Rust", https://astral.sh/blog/uv
A new space of potential optimization is now accessible to Python developers. We can now use uv
to make our development environment build faster. A modest 8x speedup in Python library installs
might shave off a shocking amount of time it takes your freshly minted Docker image to build,
especially if you have lots of Python library dependencies. Now, imagine an 80-115x speedup with caching.
Docker images also use caching after an image is built the first time. They are an optimization use case
along with building your development environment in general. In some development shops,
this could cut a lot of time installing developer tooling. It's a potential incredible improvement
we can now make with uv!
In the case of Rye and uv, two developers simultaneously identified the same opportunity
and are now combining their efforts. Sounds like a win for all Python developers. Armin Ronacher, the
creator of the Flask web framework and Charlie Marsch with the proven success of ruff are converging
to tackle one of Python's biggest pain points. They could be merged into a "cargo for Python" super tool eventually:
Will Rye be retired for uv?
Not today, but the desire is that these tools eventually converge into one.
- Armin Ronacher, "Rye Grows with uv", https://lucumr.pocoo.org/2024/2/15/rye-grows-with-uv/
Per Armin's recent blog post, Rye is probably not the final solution. He thinks Rye will get absorbed
into a more fleshed out project like uv. It seems Python packaging will continue evolving and improving,
a welcome sight for Pythonistas!
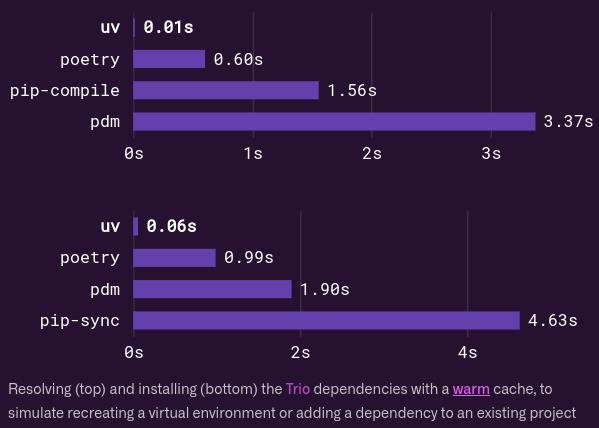
Image Source: "uv: Python Packaging in Rust", https://astral.sh/blog/uv
Install uv and rye
pip install uv
pip install rye

# Alternative install for uv with curl
curl -LsSf https://astral.sh/uv/install.sh | sh
# Alternative Install for rye on Linux and Mac
curl -sSf https://rye-up.com/get | bash
Create a Virtual Environment With uv
uv venv  # Create a virtual environment at .venv.
# Activate venv on macOS and Linux.
source .venv/bin/activate
Installing a New Module With uv
uv pip install requests
pip sync a requirements.txt file with uv
uv pip sync requirements.txt # Install from a requirements.txt file.
Optional: Configure Rye on Top of uv
rye config --set-bool behavior.use-uv=true
Create a New Python project With Rye
rye init my-project
rye pin 3.10
rye add black
rye sync
rye run black
uv and rye Documentation and Blog Links
uv: Python Packaging in Rust
uv Github Repo
Rye Grows with uv
Rye User Guide
Feb 09, 2024
Below are some ways to free up disk space on your computer. This will be most helpful
for Ubuntu users and Python developers. The pip examples show what I used on my Python
version 3.11, so if you're running a different version use that number, like
pip3.12, pip3.10, pip3.9, etc.
Benchmark your current disk space.
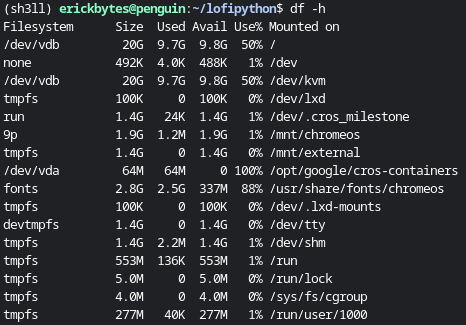
Before you start freeing up space, you might want to see the current state of your
hard drive. You can print human readable disk space stats on Ubuntu with the df command.
df -h
Alternatively, here is a Python script that reads available disk space from your hard drive.
 1
 2
 3
 4
 5
 6
 7
 8
 9
10
11
12
13
14
15
16
17
18
19
20
21
22
23
24
25
26
27
28
29
30
31
32 | import shutil
def readable_format(size: int) -> str:
"""Converts a bytes integer to a human-readable format.
Args:
size (int): The bytes integer to convert.
Returns:
str: The human-readable format of the bytes integer.
"""
for unit in ["B", "KB", "MB", "GB", "TB"]:
if size < 1000:
return f"{size:.2f} {unit}"
size /= 1000
return f"{size:.2f} PB"
def disk_space(path="."):
"""Returns the current total, used and free disk space in bytes."""
usage = shutil.disk_usage(path)
total_space = usage.total
used_space = usage.used
free_space = usage.free
return total_space, used_space, free_space
# Call the function with the current directory (you can specify a different path)
total_space, used_space, free_space = disk_space()
print(f"Total space: {readable_format(total_space)}")
print(f"Used space: {readable_format(used_space)}")
print(f"Free space: {readable_format(free_space)}")
|
Total space: 21.47 GB
Used space: 10.34 GB
Free space: 10.50 GB
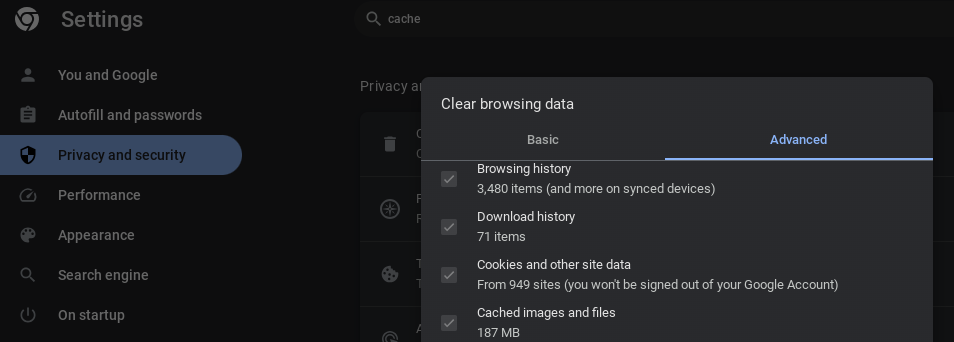
Clear your browser cache.
Purge your pip cache.
Before purging the Python pip package manager's cache, you can use the pip cache info command to see how much
storage is consumed by the cache.
pip3.11 cache info
Next, use the pip cache purge command
to clear up space on your system. Pip will print how many files it removed to the terminal.
pip3.11 cache purge

Uninstall unnecessary Python libraries.
I tend to build up modules that I installed to see how it works or to quickly test something out,
then never use again. It makes sense to cull your pip installed libraries occasionally.
Be aware that sometimes an unknown module may be a required dependency of a module
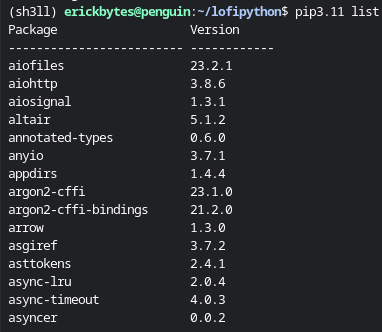
you want to use. First, use the pip list command to see your installed libraries:
pip3.11 list
The pip uninstall command makes removing Python libraries easy.
For example, let's say you're already using both the ruff Python linter and black.
The ruff module recently introduced a new formatter that is more or less identical
to Black. Therefore, I can uninstall black and the use "ruff format" command instead
to format my code.
pip3.11 uninstall black
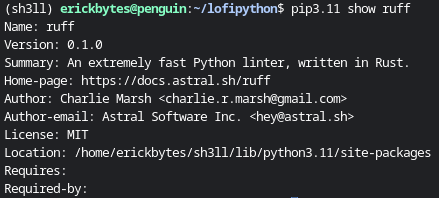
If you're not sure about a package, use the pip show command to learn more about it:
pip3.11 show ruff
Run the autoremove Linux command.
autoremove is used to remove packages that were automatically installed to satisfy
dependencies for other packages and are now no longer needed as dependencies changed
or the package(s) needing them were removed in the meantime.
- Linux apt Man Pages
sudo apt autoremove
Run the clean and autoclean Linux commands.
sudo apt clean
sudo apt autoclean
Read more on Ask Ubuntu: What is the difference between the options "autoclean" "autoremove" and "clean"?
Purge unnecessary Linux packages.
First, create a text file with all your installed Linux packages. Then browse the
packages and assess if they can be safely removed.
apt list --installed > installed_packages.txt
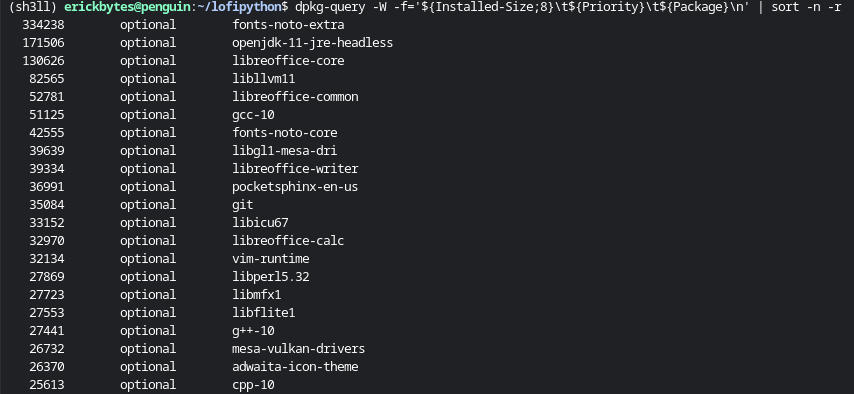
You'll free up more space by deleting the largest optional packages. To list your installed
packages in order of their file sizes and priority, you can use dpkg-query:
dpkg-query -W -f='${Installed-Size;8}\t${Priority}\t${Package}\n' | sort -n -r
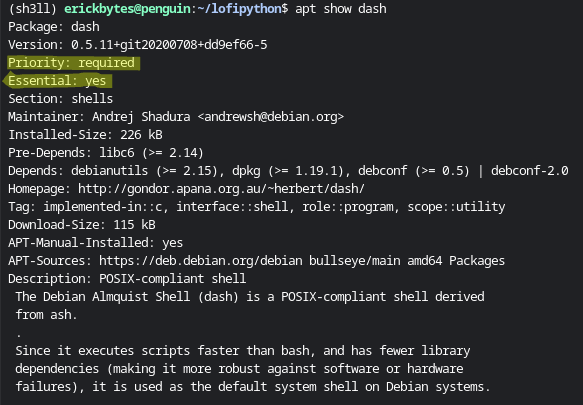
Once you've targeted a package, learn more about it with the apt show command.
It shows if a package is essential or required, a description and its dependency modules.
Optional packages are probably safe to delete assuming it's not a dependency of
software you're actually using. However, purge with caution. Some of these packages are
used in the software underneath your Ubuntu environment. Any leftover packages will
be removed by the autoremove command if they are "orphaned" after you purge a package.
apt show <package-name>
If you are certain a Linux package can be deleted, the apt-get purge command removes
a package and all configuration files from your computer. Be careful not to remove
any critical Linux packages.
sudo apt-get purge <package-name>
Find and delete your largest Linux files.
This command prints the largest files on your root Linux file system. Then you can
use the rm command to remove the file. Hint: sometimes PDF files can be deceptively
large and can be good targets to free up space.
sudo find / -xdev -type f -size +25M -exec du -sh {} ';' | sort -rh | head -n 20
rm ~/large_file.pdf
That sums up a few ways Ubuntu users and Python developers can add some extra available
disk space. It can definitely be frustrating to watch an install fail because there's
no more space on your computer. These are a few strategies you can deploy to make room
to operate on a disk space constrained system.
Feb 05, 2024
Below is a slightly modified adaptation of the Espere.in Step By Step Guide
by Abdulla Fajal. I needed to make a few changes to the code to get things to work.
I also expanded the example to show how I imported cities data to the Django model.
In this post, I'll show how you can use AJAX and jQuery Autocomplete
with a Django model to create a form with city auto-completion.
Add a Model to models.py
| class City(models.Model):
city_name = models.CharField("Origen", max_length=200)
country = models.CharField("País", max_length=200)
|
Register the City Model in admin.py
| from django.contrib import admin
from .models import City
admin.site.register(City)
|
Migrate the Django Model
python manage.py makemigrations City
python manage.py migrate
Add Auto-complete TextInput() to forms.py
The key items here are the "id" attribute holding the value "search-input" and
the "name" attribute with value "city_name". Together, these values will tell jQuery
for which form element to render the autocomplete view and which model field you targeting
to fill into the autocomplete view.
1
2
3
4
5
6
7
8
9
10
11
12
13
14
15
16
17 | from django import forms
from bookings.models import Booking
class BookingForm(forms.ModelForm):
class Meta:
model = Booking
fields = "__all__"
widgets = {
"city": forms.TextInput(
attrs={
"class": "form-control",
"id": "search-input",
"name": "city_name",
"placeholder": "Type to search",
}
)
}
|
Download the World Cities Database from Simplemaps
The World Cities Database basic version
is free and allowed for commercial use. In this example, this provides the cities data.
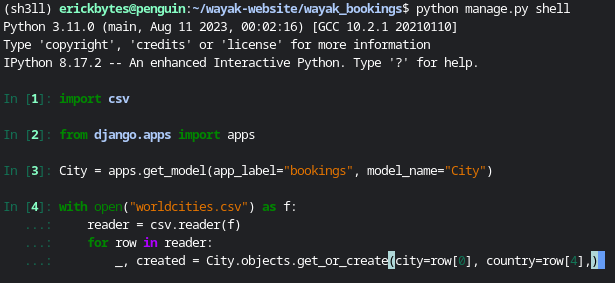
Import the Cities Database to Django Model
Now we need to import the cities to our Django model. I achieved this by running
the below code in the Django shell and entering each line individually. The code was
modified from a Stack Overflow post.
The World Cities data stores the city in the first column (index 0) and the country
in the 5th column (index 4).
python manage.py shell
| import csv
from django.apps import apps
City = apps.get_model(app_label="bookings", model_name="City")
with open("worldcities.csv") as f:
reader = csv.reader(f)
for row in reader:
_, created = City.objects.get_or_create(city=row[0], country=row[4],)
|
View Your City Model in the Admin Panel
Enter the below command to start your local Django development server. Then you
can go to http://127.0.0.1:8000/admin in a web browser to see your model on the back-end.
python manage.py runserver
Add jQuery Scripts to HTML File
Add the jquery import scripts to your HTML <head> tag.
| <link rel="stylesheet" href="https://code.jquery.com/ui/1.12.1/themes/base/jquery-ui.css" type="text/css" media="all" />
<!-- Add jQuery and jQuery UI JavaScript -->
<script src="https://code.jquery.com/jquery-3.6.4.min.js"></script>
<script src="https://code.jquery.com/ui/1.12.1/jquery-ui.js"></script>
|
Add the jQuery autocomplete script to the bottom of your HTML. This is where we
reference the "search-input" id in our form and specify the url route "/ajax_calls/search/".
1
2
3
4
5
6
7
8
9
10
11
12
13 | <script>
$(document).ready(function(){
$("#search-input").autocomplete({
source: "/ajax_calls/search/",
minLength: 2,
open: function(){
setTimeout(function () {
$('.ui-autocomplete').css('z-index', 99);
}, 0);
}
});
});
</script>
|
Add the Autocomplete View to Views.py
Note this script is using the XMLHttpRequest API,
which is used in combination with AJAX.
 1
 2
 3
 4
 5
 6
 7
 8
 9
10
11
12
13
14
15
16
17
18
19
20
21
22
23
24
25
26
27
28
29
30
31
32
33
34
35
36
37 | import json
from django.apps import apps
from django.forms.models import model_to_dict
from django.shortcuts import render
from forms import BookingForm
from django.http import HttpResponse, HttpResponseRedirect
def index(request):
"""Displays an HTML page with a form. If the request is a post, save the data to the DB."""
if request.method == "POST":
# Create a form instance and populate it with data from the request.
form = BookingForm(request.POST)
if form.is_valid():
new_booking = form.save()
return HttpResponseRedirect(f"/confirmation_page")
context = {}
context["form"] = BookingForm()
return render(request, "simple_django_form.html", context)
def autocomplete(request):
"""Show the City model records via AJAX + jQuery."""
if request.headers.get("x-requested-with") == "XMLHttpRequest":
City = apps.get_model(app_label="bookings", model_name="City")
term = request.GET["term"]
search_results = City.objects.filter(city_name__startswith=term)
cities = [f"{result.city_name}, {result.country}" for result in search_results]
data = json.dumps(cities)
else:
data = "fail"
return HttpResponse(data, "application/json")
def confirmation_page(request):
"""Show a confirmation page thanking the client for their business."""
return HttpResponse("Thanks for signing up!")
|
Write the HTML for a Simple Django Form
Here is the template I used. It differs slightly from the template in the Django docs.
| {% extends 'base.html' %}
{% block content %}
<form method="post">
{% csrf_token %}
{{ form.as_p }}
<input type="submit" value="Submit">
</form>
{% endblock %}
|
Understanding Ajax + XMLHttpRequest
Ajax is a technique that uses XMLHttpRequest to exchange data with a web server
without reloading the whole page. XMLHttpRequest is an object that allows web apps
to make HTTP requests and receive the responses programmatically using JavaScript.
Ajax stands for Asynchronous JavaScript and XML, which means that the data exchange
can happen in the background, while the user interacts with the web page.
- Bing AI
Add the URL Route to urls.py
| from django.urls import path
from . import views
app_name = "your_app_name"
urlpatterns = [
path("", views.index, name="index"),
path("confirmation_page/", views.confirmation_page, name="confirmation page"),
path('ajax_calls/search/', views.autocomplete, name='city_autocomplete'),
]
|
Voila! The City Autocomplete View
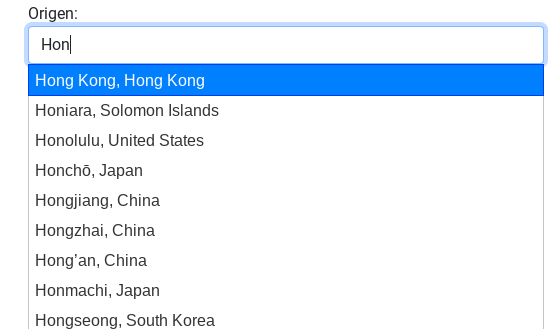
Note: to achieve the appearance of the form text box and autocomplete dropdown, I installed
the django-bootstrap-v5 python module
This felt very rewarding to see once it was working. I stretched my abilities
outside of coding only in Python to achieve this functionality in my website.
Someday I would like to be an experienced Javascript developer also. jQuery has
been a staple in web development for many years. Auto-complete is just one of the features
that this core Javascript library enables. I am definitely intrigued to explore jQuery further.
Want to read more about Django? Check out my
notes on Django here.
Feb 02, 2024
First Impressions of Django
Picking up Django felt right. In the past I used
other Python web frameworks like web2py and flask.
I mostly avoided Django before now because it felt a bit overkill for the smaller
toy apps I made in my beginning years as a Python developer. For example, this blog
is made with the Pelican static site generator, a
choice which has served me well.
Recently, a project came my way that seemed a good fit to apply Django. The task
required building a travel booking website. For this use case, Django shined. It
fits like a glove on a seasoned Python programmer. I am impressed how quickly I
adapted to it and thrived as I made my minimum viable product website.
Kudos to the Django developers that I, a typical Python programmer
aided with artificial intelligence could rapidly develop using their tools to
achieve my goals. If I could learn to write some decent CSS, I'd be unstoppable!
I highly recommend all Python programmers pick Django for their web apps with more
robust requirements. I say this with no slight to fellow heavyweight Flask or other
popular Python web frameworks like Tornado,
Bottle, CherryPy
or py4web . All of these can all be justified in the
right situation due to their unique capabilities. Django stands out because it's
pretty easy to reach for things that already exist in the library to get what you
need done. Other frameworks may require a more nuanced skillset to achieve the same results.
Ok, enough pontification. Here are my notes of key Django concepts.
Start with the Django official tutorial.
The tutorial is lengthy and starts from the ground up. I commend its thoroughness.
Start there and work your way out. Django Documentation Tutorial
Django Models, Forms & Fields, models.py and forms.py
Your forms.py and models.py files are crucial pieces to render a form, collect data
and store it in the database.
manage.py
This file is used for database model migrations, creating a new app and accessing
your app through the shell.
views.py
The views.py file contains the Python functions that execute the flow of your app.
Each function in the views.py can be a view.
urls.py
The urls.py defines your url schema so that when you go to "example.com/any_page",
you can tell django which view to show there.
| from django.urls import path
from . import views
app_name = "bookings"
urlpatterns = [
path("", views.index, name="index"),
path("hotels/", views.hotels, name="hotels"),
]
|
settings.py
After you create your app structure with a django manage.py command, a settings.py is automatically generated.
You will need to make edits here occasionally, such as changing the value of debug
to true or false. You may need to add newly installed apps or make other changes
in your settings.py to get things to work.
HTML + CSS Required
Your HTML and CSS skills will come in handy when working with Django or any web framework.
This is not a big surprise. You almost always need to know HTML and CSS to mold
your website to your requirements.
Django Template Language + Filters
Django comes with its own HTML template language
to help you dynamically populate values in HTML. You can also use its built-in template tags and filters
to transform values directly in the HTML. Additionally, Django lets you write
custom template tags and filters
to use Python for more complex transformations or on the fly mathematic calculations.
Below is an example of how you can use Django's templating language to loop through
your Django model. Django has built-in support for if statements inside its HTML.
1
2
3
4
5
6
7
8
9
10
11
12
13
14 | {% for hotel in hotels %}
<p>
{% if hotel.all_inclusive %}
This hotel is all included.
{% else %}
This hotel is not all included.
{% endif %}
<br>
{% if hotel.accepts_groups %}
This hotel accepts groups.
{% else %}
This hotel doesn't accept groups.
{% endif %}
</p>
|
Javascript + jQuery Friendly
Django seems fully capable of integrating with Javascript libraries. I was able
to get jQuery + AJAX request autocomplete functionality working in my form with
help from Bing's AI Chat. I followed along with this helpful blog post
to get my jQuery script working!
External Django Python Libraries
Another plus of Django due to its popularity is the amount of external modules that
Python developers have written to add features and functionality. For example,
django-autocomplete-light
and the django-bootstrap-v5
CSS library are installed with pip. I successfully used django-bootstrap-v5 to add
bootstrap CSS styling to my website. Note this library requires a slightly older
version of Django.
Often there are several ways to get something done in Django, with external Python libraries
or Javascript libraries each a possibility to succeed. After several hours of
failing to get django-autocomplete-light working, I achieved the same result with
jQuery. It's always good to have options.
The Admin Panel + admin.py
One of the best out of the box features of Django is its admin panel and user model.
If you intend to build a website for users, this makes Django a great choice.
Don't forget to register your models in your admin.py.
apps.get_model()
You can import your models at the top of your code or use this handy convenience function to
retrieve it directly.
model_to_dict()
This is another function Django provides for converting a model object class to a Python dictionary.
Once a model is in dictionary format, you can pass it to a django form's "initial" argument
to easily auto-populate a form.
request.GET()
Django has its own request objects. You can pass a raw query string to HttpResponseRedirect.
Then, in the view of the target page, you can use this function to get the querystring
value by passing its key.
render() and contexts
The render function renders an HTML document. This function has a context argument
that allows you to pass variables into the HTML view.
How to Install Django
pip install Django
Django Views.py Code Example
1
2
3
4
5
6
7
8
9
10
11
12
13
14
15
16
17
18
19
20
21
22
23
24
25
26
27
28
29
30
31
32
33
34
35
36
37
38
39
40
41
42
43
44
45
46
47 | from django.apps import apps
from django.forms.models import model_to_dict
from django.shortcuts import render
from forms import BookingForm
def index(request):
"""Displays an HTML page with a form. If the request is a post, save the data
to the DB. If booking_id is passed in the url querystring, populate the form
with data from that id."""
if request.method == "POST":
# Create a form instance and populate it with data from the request.
form = BookingForm(request.POST)
if form.is_valid():
new_booking = form.save()
return HttpResponseRedirect(f"/hotels?booking_id={new_booking.id}")
try:
booking_id = request.GET["booking_id"]
except:
booking_id = ""
if booking_id.isdigit():
Booking = apps.get_model(app_label="your_app_name", model_name="Booking")
booking = Booking.objects.get(id=booking_id)
booking_dict = model_to_dict(booking)
context = {}
if booking_dict:
context["form"] = BookingForm(initial=booking_dict)
else:
context["form"] = BookingForm()
return render(request, "simple_django_form.html", context)
def hotels(request):
"""Render a list of hotels to for clients to view from the Hotel model."""
booking_id = request.GET["booking_id"]
Booking = apps.get_model(app_label="your_app_name", model_name="Booking")
booking = Booking.objects.get(id=booking_id)
Hotel = apps.get_model(app_label="your_app_name", model_name="Hotel")
hotels = Hotel.objects.filter(city__contains=booking.to_city)
# Pass context to access variables directly in hotels.html: {{ return_date }}
context = {
"hotels": hotels,
"booking_id": booking_id,
"departure_date": booking.departure_date.date(),
"return_date": booking.return_date.date(),
"to_city": booking.to_city,
}
return render(request, "hotels.html", context)
|
Basic Model Example
 1
 2
 3
 4
 5
 6
 7
 8
 9
10
11
12
13
14
15
16 | from django.db import models
class Booking(models.Model):
departure_date = models.DateTimeField("departure date")
return_date = models.DateTimeField("return date")
from_city = models.CharField("Origen", max_length=200)
to_city = models.CharField("Destino", max_length=200)
class Hotel(models.Model):
name = models.CharField(max_length=200)
price = models.DecimalField(max_digits=10, decimal_places=2)
address = models.CharField(max_length=200)
city = models.CharField(max_length=200)
all_inclusive = models.BooleanField()
photo = models.ImageField(upload_to="hotels")
|
Hopefully this helped you get started with Django. In my own experience, once you
get some momentum going with this web framework, you'll progress rapidly!
Supplementary Django Links
Django Form Fields Reference
Django Model Fields Reference
Django Settings Reference
Django How-to Guides
Jan 15, 2024
Below I've highlighted some niche functions in Python's pandas library. I've plucked
a few examples from the pandas documentation and the
Delta Airlines Airports Wikipedia HTML table
for sample data. This post is aimed at the more advanced stuff on the fringes of the pandas docs.
Here are some oddities of the less traveled parts of the pandas documentation.
You never know what you'll find there, it's always evolving. Images were sourced
from the pandas documentation.
Install pandas + lxml
Install Python dependencies with pip: pandas and lxml, required for read_html()
python3.12 -m pip install pandas
python3.12 -m pip install lxml
What's Not Mentioned Here
I skipped the standard must know functions like pd.read_csv(),
pd.read_excel(), pd.DataFrame.to_csv(), pd.DataFrame.to_json()
and so on. The documentation on these functions is extensive. I recommend checking
out all the ways you can customize behavior of your data with their arguments.
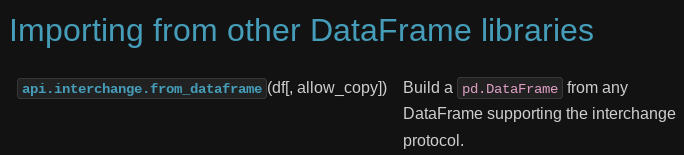
pd.DataFrame.__dataframe__() + pd.api.interchange.from_dataframe()
Import a DataFrame from another library via the DataFrame interchange protocol.
The .__dataframe__() dunder method returns an interchange object which can be used to
convert another dialect of dataframe to pandas. If the protocol is supported,
a dataframe interchange object has the methods "column_names" and "select_columns_by_name".
If you're dealing with a flavor of dataframe other than pandas, keep in mind it may support
the DataFrame interchange protocol.
pandas.api.interchange.from_dataframe() documentation

pandas interchange object documentation
| import pandas as pd
df_not_necessarily_pandas = pd.DataFrame({'A': [1, 2], 'B': [3, 4]})
interchange_object = df_not_necessarily_pandas.__dataframe__()
df_pandas = (pd.api.interchange.from_dataframe
(interchange_object.select_columns_by_name(['A'])))
|
>>> df_pandas
A
0 1
1 2
>>> interchange_object.column_names()
Index(['A', 'B'], dtype='object')
pd.read_html(url)
pd.read_html() accepts a website url. It returns a list of all HTML tables
as DataFrames. After getting the table as a dataframe, use ".drop()" to drop a column and ".fillna()"
to fill NA values as blanks. read_html() Documentation

| import pandas as pd
url = "https://en.wikipedia.org/wiki/List_of_Delta_Air_Lines_destinations"
airports = pd.read_html(url)[0]
# Drop the irrelevant "Refs" column and fill nans blank.
airports = airports.drop("Refs", axis=1).fillna("")
print(airports.head())
|
pd.DataFrame.to_html()
This function returns your tabular data as an HTML string.
df.head() accepts a number and returns a df with that many records, in this case 2.
to_html() Documentation

| html = airports.head(2).to_html(index=False)
print(html)
|
<table border="1" class="dataframe">
<thead>
<tr style="text-align: right;">
<th>Country / Territory</th>
<th>City</th>
<th>Airport</th>
<th>Notes</th>
</tr>
</thead>
<tbody>
<tr>
<td>Antigua and Barbuda</td>
<td>Osbourn</td>
<td>V. C. Bird International Airport</td>
<td>Seasonal</td>
</tr>
<tr>
<td>Argentina</td>
<td>Buenos Aires</td>
<td>Ministro Pistarini International Airport</td>
<td></td>
</tr>
</tbody>
</table>

pd.DataFrame.memory_usage()
Returns the memory usage of each column in bytes. Per the docs, "this value is displayed in DataFrame.info by default."
.memory_usage() Documentation

| # To include memory footprint of object dtypes, pass deep=True.
print(airports.memory_usage(deep=True))
|
Index 132
Country / Territory 24125
City 21164
Airport 30660
Notes 19237
dtype: int64
1
2
3
4
5
6
7
8
9
10
11
12
13
14
15
16
17
18 | def readable_format(size: int) -> str:
"""Converts a bytes integer to a human-readable format.
Args:
size (int): The bytes integer to convert.
Returns:
str: The human-readable format of the bytes integer.
"""
for unit in ["B", "KB", "MB", "GB", "TB"]:
if size < 1000:
return f"{size:.2f} {unit}"
size /= 1000
return f"{size:.2f} PB"
# Use pd.Series.apply() to convert bytes to "human readable" data format.
memory_usage = airports.memory_usage(deep=True).apply(readable_format)
print(memory_usage)
|
Index 132.00 B
Country / Territory 24.12 KB
City 21.16 KB
Airport 30.66 KB
Notes 19.24 KB
dtype: object
pd.DataFrame.empty
Every pandas DataFrame has a ".empty" attribute. If Series/DataFrame is empty,
returns True, if not returns False. .empty Documentation
| print(airports.empty)
# False
if airports.empty:
print("DataFrame has no data.")
else:
print("DataFrame contains data.")
# DataFrame contains data.
|
pd.DataFrame.T
Every pandas DataFrame has a ".T" attribute. It returns the transposed version
of the DataFrame. .T Documentation
>>> airports.head(3).T
0 1 2
Country / Territory Antigua and Barbuda Argentina Aruba
City Osbourn Buenos Aires Oranjestad
Airport V. C. Bird International Airport Ministro Pistarini International Airport Queen Beatrix International Airport
Notes Seasonal
pd.DataFrame.convert_dtypes() + .infer_objects()
These are 2 functions for swiftly handling data types in your tabular data.
Note: these are alternatives to the "astype()" function, which is used more commonly.
Use astype() to set a column or dataframe to a specific dtype. Use infer_objects() to
infer more suitable types for object columns. Use convert_dtypes() to let pandas choose the best possible dtype.
| # Convert columns to the best possible dtypes using dtypes supporting pd.NA.
typed_df = airports.convert_dtypes()
print(typed_df.dtypes)
# Attempt to infer better dtypes for object columns.
inferred_df = airports.infer_objects()
print(inferred_df.dtypes)
|
>>> airports.head()
Country / Territory City Airport Notes
0 Antigua and Barbuda Osbourn V. C. Bird International Airport Seasonal
1 Argentina Buenos Aires Ministro Pistarini International Airport
2 Aruba Oranjestad Queen Beatrix International Airport
3 Australia Sydney Sydney Airport
4 Austria Vienna Vienna International Airport Terminated
>>> airports.dtypes
Country / Territory object
City object
Airport object
Notes object
dtype: object
>>> typed_df.dtypes
Country / Territory string[python]
City string[python]
Airport string[python]
Notes string[python]
dtype: object
>>> inferred_df.dtypes
Country / Territory object
City object
Airport object
Notes object
dtype: object
convert_dtypes Documentation
+ infer_objects() Documentation
pd.Series.str.get(index)
str.get() is available via the pandas Series string accessor.
This function is useful when your dataset contains a column holding a list in each cell.
It also works on strings by returning the character at the index of a string.
You can pass an index and that value will be returned for each cell in a column.
str.get() Documentation
| import pandas as pd
s = pd.Series(
["String", (1, 2, 3), ["a", "b", "c"], 123, -456, {1: "Hello", "2": "World"}]
)
new_column = s.str.get(1)
print(new_column)
|
>>> s
0 String
1 (1, 2, 3)
2 [a, b, c]
3 123
4 -456
5 {1: 'Hello', '2': 'World'}
dtype: object
>>> s.str.get(1)
0 t
1 2
2 b
3 NaN
4 NaN
5 Hello
dtype: object
Pique Your Curiosity With Pandas
Now you know a few of my favorite pandas API oddities. It's always time
well spent reading the Pandas API documentation.
Check out this other post I wrote about pandas
for a deeper dive into this powerful Python module.
Oct 27, 2023
If you host a public space or office with shared Wi-Fi, a QR code skips the tedious process of
exchanging your network's details. This is nice to have as an alternative to asking
people to manually enter an auto-generated, cryptic, error-prone 16 character string password.
Especially when you frequently have customers or new people asking for the information.
You could post a sign with the network name and password like most coffee shops do,
or you could try a QR code. Here's how to create a QR code for your Wi-Fi network.
To accomplish this task, I found the wifi-qr-code-generator library on pypi.
It makes creating a Wi-Fi QR code very simple with help from the pillow and qrcode modules.
It is a great example of a library that has a very specific purpose and does it well.
The connection will only be automatic if your password is correct, so make sure you type it carefully.
The library has two ways to create a QR code:
- Run a Python script with the network details.
- Use wifi-qr-code-generator's CLI and respond to prompts for Wi-Fi details.
Install wifi-qrcode-generator
pip install wifi-qrcode-generator
Generating a QR Code Python Script
This code snippet prints the qr code to the terminal screen, then saves it as a png image.
| #!/usr/bin/env python3
import wifi_qrcode_generator.generator
qr_code = wifi_qrcode_generator.generator.wifi_qrcode(
ssid="add_wi-fi_network_name",
hidden=False,
authentication_type="WPA",
password="add_wi-fi_password",
)
qr_code.print_ascii()
qr_code.make_image().save("wifi-qr-code.png")
|
QR Code Example Image

Wi-Fi Auto-Connected Confirmation

Generating a QR Code With CLI Command
The 2nd way to use this module is via a built-in command line interface to make your QR code.
It can be invoked with this command:
wifi-qrcode-generator
Small Projects for the Win
Some of my favorite coding happens when I start with a simple goal, research
the libraries available, apply Python skills and get a tangible result
in a short period of time. If you want to streamline sharing your Wi-Fi network,
remember this practical Python library!
Oct 25, 2023
When I first started working with APIs, I had a bad habit of passing URL parameters
as one long ugly string. Anything longer than 79 characters violates PEP-8.
It's also hard to read and can be difficult to edit the code in your text editor if the URL is trailing off the screen.
In this post, you'll find some alternatives to the primitive "long ugly string" approach.
Did you know? URL stands for "uniform resource locator".
Below are two ways to neatly format your URLs so that they have parameters.
Both involve using a Python dictionary. The requests API allows you to pass
a dictionary or list of tuples to its params argument. Alternatively, if you want
to see the full URL as a string, there's a sleek way to format URL arguments
with urllib's urlencode function.
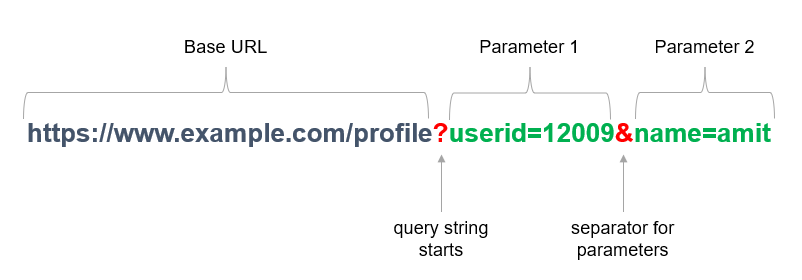
source: Geeks for Geeks
Pass a dictionary to the requests params argument to include URL arguments.
You often want to send some sort of data in the URL’s query string.
If you were constructing the URL by hand, this data would be given as key/value pairs
in the URL after a question mark, e.g. httpbin.org/get?key=val.
Requests allows you to provide these arguments as a dictionary of strings, using the params keyword argument.
- requests documentation, Passing Parameters in URLs
| import requests
payload = {
"email": "[email protected]",
"message": "This email is not real.",
"status": "inactive"
}
r = requests.get("https://httpbin.org/get", params=payload)
print(r.text)
|
Use urllib's urlencode function to dynamically construct URL from a dictionary.
1
2
3
4
5
6
7
8
9
10
11
12
13
14
15 | import requests
from urllib.parse import urlencode
payload = {
"email": "[email protected]",
"message": "This email is not real.",
"status": "inactive"
}
# Returns str of URL encoded parameters.
url_parameters = urlencode(payload)
# >>> url_parameters
# "email=example%40example.com&message=This+email+is+not+real.&status=inactive"
url = f"https://httpbin.org/get?{url_parameters}"
r = requests.get(url)
print(r.text)
|
Arguments can be a good thing.
This seemingly basic HTTP formatting was something that took me too long to realize.
I hope it helps you keep your URLs tidy and your HTTP requests more readable.
Read More About URL Parameters
Passing Parameters in URLS, requests Documentation
urllib Examples, Python Documentation
requests API Documentation Reference
Stack Overflow, Python Dictionary to URL Parameters
Oct 13, 2023
I recently noticed that the Yahoo Finance stock summary command line interface (CLI) I made seemed to be slowing down. Seeking to understand what was happening in my code, I remembered Python has multiple profilers available like Scalene, line_profiler, cProfile and pyinstrument. In this case, I was running my code on Python version 3.11.
First, I tried cProfile from the Python standard library. It is nice to have without any install required! However, I found its output to be tough to interpret. I also remembered I liked a talk I saw about Scalene, which gave a thorough overview of several Python profilers and how they're different. So next, I tried Scalene. Finally, I found pyinstrument and can safely say it is now my favorite Python profiler. This post will focus on how I used pyinstrument to make my command line tool faster.
Install pyinstrument with pip
pip install pyinstrument
I preferred the format in which pyinstrument presented the modules, functions and time they consumed in a tree structure. Scalene's percentage-based diagnosis was useful also. Scalene showed the specific lines where code was bottlenecked, whereas pyinstrument showed the time spent in each module and function. I liked that I could see time of specific functions from the external modules I was using with pyinstrument. For example, the beautiful soup and rich modules both consumed shockingly little time. However, the pandas module took a whole second.
Just importing the pandas module and doing nothing else was taking up to and sometimes over a second each time my CLI ran. On a script that takes about four seconds to execute, one second is 25% of the total run time! Once I realized this, I decided to only import the pandas module if my CLI's --csv argument was given. I was only using pandas to sort stocks and write a CSV. It wasn't critical functionality for my CLI.
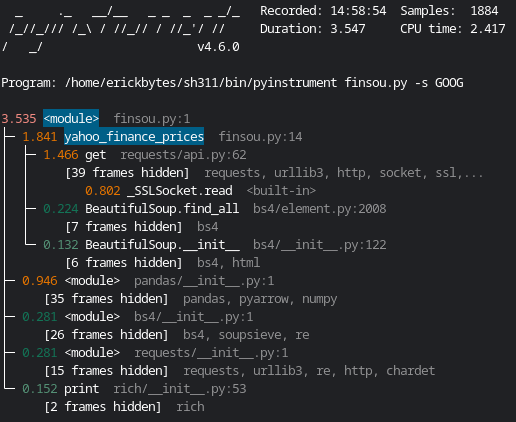
My CLI script accepts a stock ticker as an argument. The below command fetches a stock report from Yahoo Finance and prints to the terminal. Swapping out "python" for pyinstrument runs the script and prints a pyinstrument report to your console.
Fetch a stock report from Yahoo.
pyinstrument finsou.py -s GOOG
pyinstrument Results With Normal Pandas Import
GOOG, Google
MSFT, Microsoft
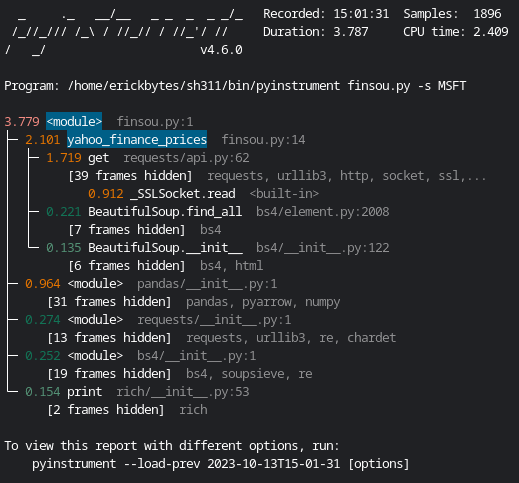
The line for the pandas module looks like this:
0.946 <module> pandas/__init__.py:1
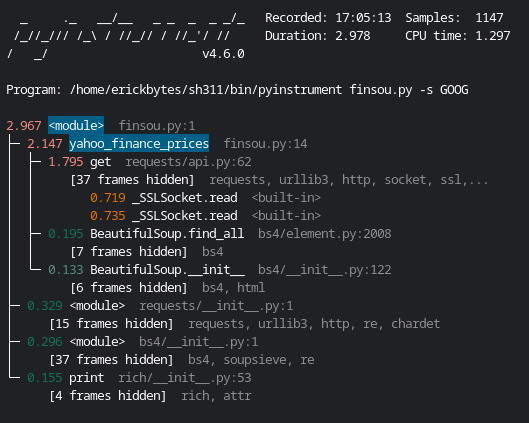
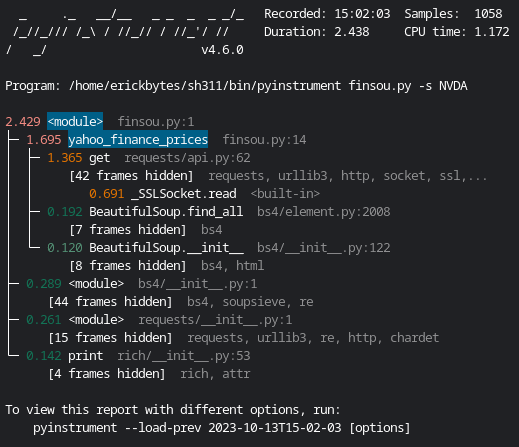
pyinstrument Results With Pandas Import Only If Necessary
After changing the pandas module to only import if needed, it is no longer eating almost a second of time. As a result, the script runs about second faster each time! Below are the pyinstrument reports for two different stocks after changing my pandas import to only be called if it was actually used:
GOOG, Google
NVDA, Nvidia
Sidebar: HTTP Request Volatility
The time that the script runs fluctuates about half a second to a few seconds based on the HTTP get request. It lags even more if my internet connection is weaker or Yahoo throttles my request because I've made too many in a short period of time. My time savings weren't gained from tinkering with the HTTP request, even though that was a time-eater. I noticed the requests module get request tends to fluctuate and sometimes causes an extra delay.
Simplified Python Example to Achieve Speed Gains
Below shows the method I used to achieve a faster CLI. Heads up, this code will not work if you run it. It's only meant to explain how I my code faster. You can find the actual script where I made this improvement here on Github.
1
2
3
4
5
6
7
8
9
10
11
12
13
14
15
16
17
18
19
20
21
22
23
24
25
26
27 | import argparse
from bs4 import BeautifulSoup
from rich import print as rprint
# Original import --> lazy import only if csv argument given: import pandas as pd
def yahoo_finance_prices(url, stock):
return "Stonk went up.", "1000%"
parser = argparse.ArgumentParser(
prog="finsou.py",
description="Beautiful Financial Soup",
epilog="fin soup... yum yum yum yum",
)
parser.add_argument("-s", "--stocks", help="comma sep. stocks or portfolio.txt")
parser.add_argument("-c", "--csv", help='set csv export with "your_csv.csv"')
args = parser.parse_args()
prices = list()
for stock in args.stocks:
summary, ah_pct_change = yahoo_finance_prices(url, stock)
rprint(f"[steel_blue]{summary}[/steel_blue]\n")
prices.append([stock, summary, url, ah_pct_change])
if args.csv:
# Importing here shaves 1 second off the CLI when CSV is not required.
import pandas as pd
cols = ["Stock", "Price_Summary", "URL", "AH_%_Change"]
stock_prices = pd.DataFrame(prices, columns=cols)
stock_prices.to_csv(args.csv, index=False)
|
Make It Fast
"Make it work, make it better, make it fast."
- Kent Beck
That's how I sped up my Python CLI by 25%. This method bucks the convention of keeping your import statements at the top of your script. In my case, it's a hobby project so I feel ok with making the trade-off of less readable code for a snappier CLI experience. You could also consider using the standard library csv module instead of pandas.
For Comparison, An import csv pyinstrument Report
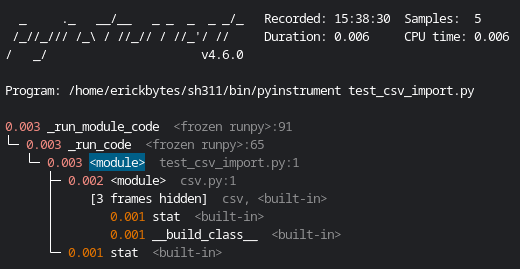
I clocked the csv module import at 0.003 or three thousandths of a second with pyinstrument. That's insanely fast compared to pandas. I chose to make a quick fix by shifting the import but using the csv module could be a better long-term solution for speeding up your scripts.
Supplementary Reading
Making a Yahoo Stock Price CLI With Python
The Python Profilers, Python Documentation
Stack Overflow Thread About Slow HTTP Requests
An Overview of Python Profiling and Diagnostic Tools
Oct 10, 2023
Over the past few years, I found a few different external Python libraries that relied on a broken Yahoo Finance API. Apparently, the API changes frequently, leaving us developers in a tough spot troubleshooting tracebacks in order to get stock data. I wanted to check my stocks' prices from the terminal. 6 months ago, dealing with these frustrations inspired me to begin making a Python command line interface (CLI) to fetch stock info directly from the Yahoo Finance website.
With an idea and curiosity to see if I could make it work, I reached for the beautifulsoup4 library, the de facto HTML parser in Python. It turned out way better than I envisioned when I started. The CLI is working great, barring any changes to Yahoo's stock page HTML or CSS code. It accepts a stock ticker and grabs stock price data from the Yahoo website in your terminal. It is designed to monitor daily moves of stocks, including after hours prices.
Here is the Github repo with the code. I've named the CLI finsou.py, which I've been pronouncing to myself as "finsoupy", a word play on fin soup, short for financial soup. The standard library argparse module provided the CLI argument ingesting functionality. The CLI uses the requests module, beautifulsoup4 and re modules. With these 3 modules, it retrieves stock info and organizes it into a tidy, color coded report that is printed to your console. After getting the essential functionality working, I added improvements like the rich module to add in terminal color formatting and tqdm for a progress bar.
The CLI currently works after the US stock market has closed normal market hours. Additionally, after hours prices for "over the counter" (OTC) traded stocks are not listed on Yahoo so an error is returned for those stocks.
Getting Started with finsou.py
- First, install the necessary Python library dependencies:
pip install beautifulsoup4
pip install pandas
pip install requests
pip install rich
pip install tqdm
- Next, clone the Github repo:
git clone https://github.com/erickbytes/finsou.py.git
- Change directory into the finsou.py folder that contains the Python script:
cd finsou.py
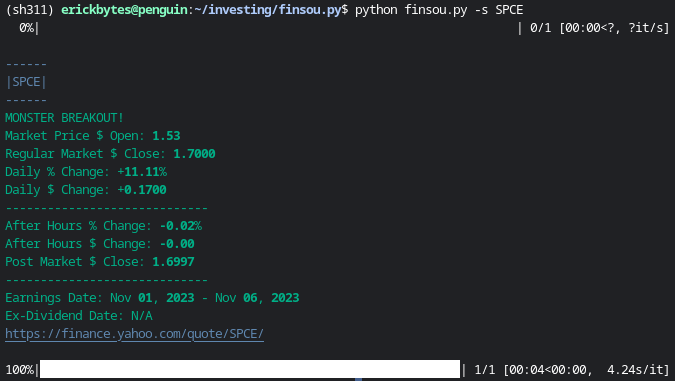
- Query a stock's daily price summary:
# Print a daily stock summary for Virgin Galactic (SPCE).
python finsou.py -s SPCE
Fetch a stock summary for multiple companies.
# Summarize a list of stocks.
python finsou.py -s BABA,SPOT,KO
Read a list of stocks from a .txt file.
# Read a list of stocks from a text file with one ticker on each line.
python finsou.py -s portfolio.txt -c "Portfolio Prices.csv"
Research + download media from investor relations websites.
Note: currently the code needs to be modified depending on the HTML structure of the page.
# Note: this is experimental and results will vary. URLs are typically buried in nested span and div tags.
python finsou.py -s GRAB -r https://investors.grab.com/events-and-presentations
How It Works
Check out the finsou.py Python script to see the complete code for how this stock report is created. Here is a brief simplified example of the logic behind the code.
 1
 2
 3
 4
 5
 6
 7
 8
 9
10
11
12
13
14
15
16
17
18 | import re
import requests
from bs4 import BeautifulSoup
stock = "SNOW"
url = f"https://finance.yahoo.com/quote/{stock}/"
user_agent = "Mozilla/5.0 (X11; Linux x86_64) AppleWebKit/534.1 (KHTML, like Gecko) Chrome/43.0.845.0 Safari/534.1"
headers = {
"Cache-Control": "no-cache",
"User-Agent": user_agent,
}
page = requests.get(url, headers=headers).text
soup = BeautifulSoup(page, "html.parser")
price_tags = soup.find_all(
class_=re.compile("Fw\(b\) Fz\(36px\) Mb\(\-4px\) D\(ib\)")
)
mkt_close_price = price_tags[0].string.replace(",", "")
print(mkt_close_price)
|
First, an HTTP request is made and parsed by beautiful soup using Python's html.parser. We can then use bs4 and regex's re.compile function to return the HTML tags with a specific CSS class. Then once we have the tags, beautiful soup gives us a ".string" attribute for each tag to return their contents as a string. This pattern was applied to return all of the data in the stock report. To find the css classes I wanted, I right-clicked the price or data on Yahoo's website in a Chrome browser and selected "Inspect". Doing this opens Chrome's developer tools and drops you into that spot in the HTML code, where you can find the class you want to target.
No Official API, No Problem
It felt good to prove the concept that you don't need an official API
to print stock data in your terminal! If you want to check in on your
portfolio's daily moves, give this CLI a try: finsou.py Github Repo
If you're looking for a more robust finance Python module,
I recommend yfinance for querying stock data.
Oct 02, 2023
LangChain is a lauded Python library in the large language model space. It seems to be riding along on the AI hype train as of late and is getting mentioned everywhere I look. I wrote this post to understand better, what is LangChain? Warning: I learned a lot by researching for this post! Below you'll find basic information about what LangChain is and code examples for a few of its use cases. I connected a few different sources that helped me fill in the gaps in my knowledge. After reading this, you'll have a basic understanding of what this Python module does and some of the diverse ways it can be applied.
A huge bonus of this library is that it has excellent documentation. On the front page, they state its main value propositions.
The main value props of LangChain are:
Components: abstractions for working with language models, along with a collection of implementations for each abstraction. Components are modular and easy-to-use, whether you are using the rest of the LangChain framework or not
Off-the-shelf chains: a structured assembly of components for accomplishing specific higher-level tasks
Off-the-shelf chains make it easy to get started. For complex applications, components make it easy to customize existing chains and build new ones.
The Github repo states LangChain is for "Building applications with LLMs through composability". Ok, so what is composability?
Composability is a system design principle that deals with the inter-relationships of components. A highly composable system provides components that can be selected and assembled in various combinations to satisfy specific user requirements. - Wikipedia
LangChain is important because it provides the function of "orchestration" in an LLM serving workflow:
The leading orchestration tool right now in the LLM space is LangChain, and it is a marvel. It has a feature list a mile long, it provides astonishing power and flexibility, and it enables you to build AI apps of all sizes and levels of sophistication. But with that power comes quite a bit of complexity. Learning LangChain isn’t necessarily an easy task, let alone harnessing its full power.
- Stephen Hood, So you want to build your own open source chatbot… – Mozilla Hacks
Sometimes an orchestration tool is required, but sometimes you can "roll your own" in a sense, as Mozilla did in their post about serving an LLM. When making your own large language model, you'll want to consider how it will be orchestrated. This is the functionality LangChain provides. In more complex LLM flows that involve tasks like writing code and subsequently running it, LangChain is essential.
Often people hook up LLMs as part of a sequence of operations. LangChain does this. It puts an LLM in series with some other tools. For instance, LLMs can’t do math, they just spout plausible answers. They can write code, because they’ve read so much of it in their training. By themselves, they can’t use it. But configure a LangChain agent with both an LLM and a Python interpreter, and it can answer word problems. First ask the LLM for a plan to solve the problem, given a Python interpreter; then when the LLM returns code, run it; then provide the answer to the LLM so it can structure the final response.
- Jessica Kerr, A Developer’s Starting Point for Integrating with LLMs
You'll also want to consider if you need to tune your own AI model, but beware that this can cost a lot of money in compute resources consumed. It seems more likely that for the AI-layperson coder, going with an off-the-shelf model via an API or open source code base makes more fiscal sense and is probably easier. However, you may achieve a unique quality of response by tuning your model to your specific use case, or providing examples as tokens for the model to consume before responding.
Model training needs lots and lots of machines in relatively close proximity to one another. It needs the absolute latest, greatest GPUs.
- Matthew Prince, James Governor, Cloudflare as an AI play. An Interview with Matthew Prince
An Example LLM Stack With LangChain
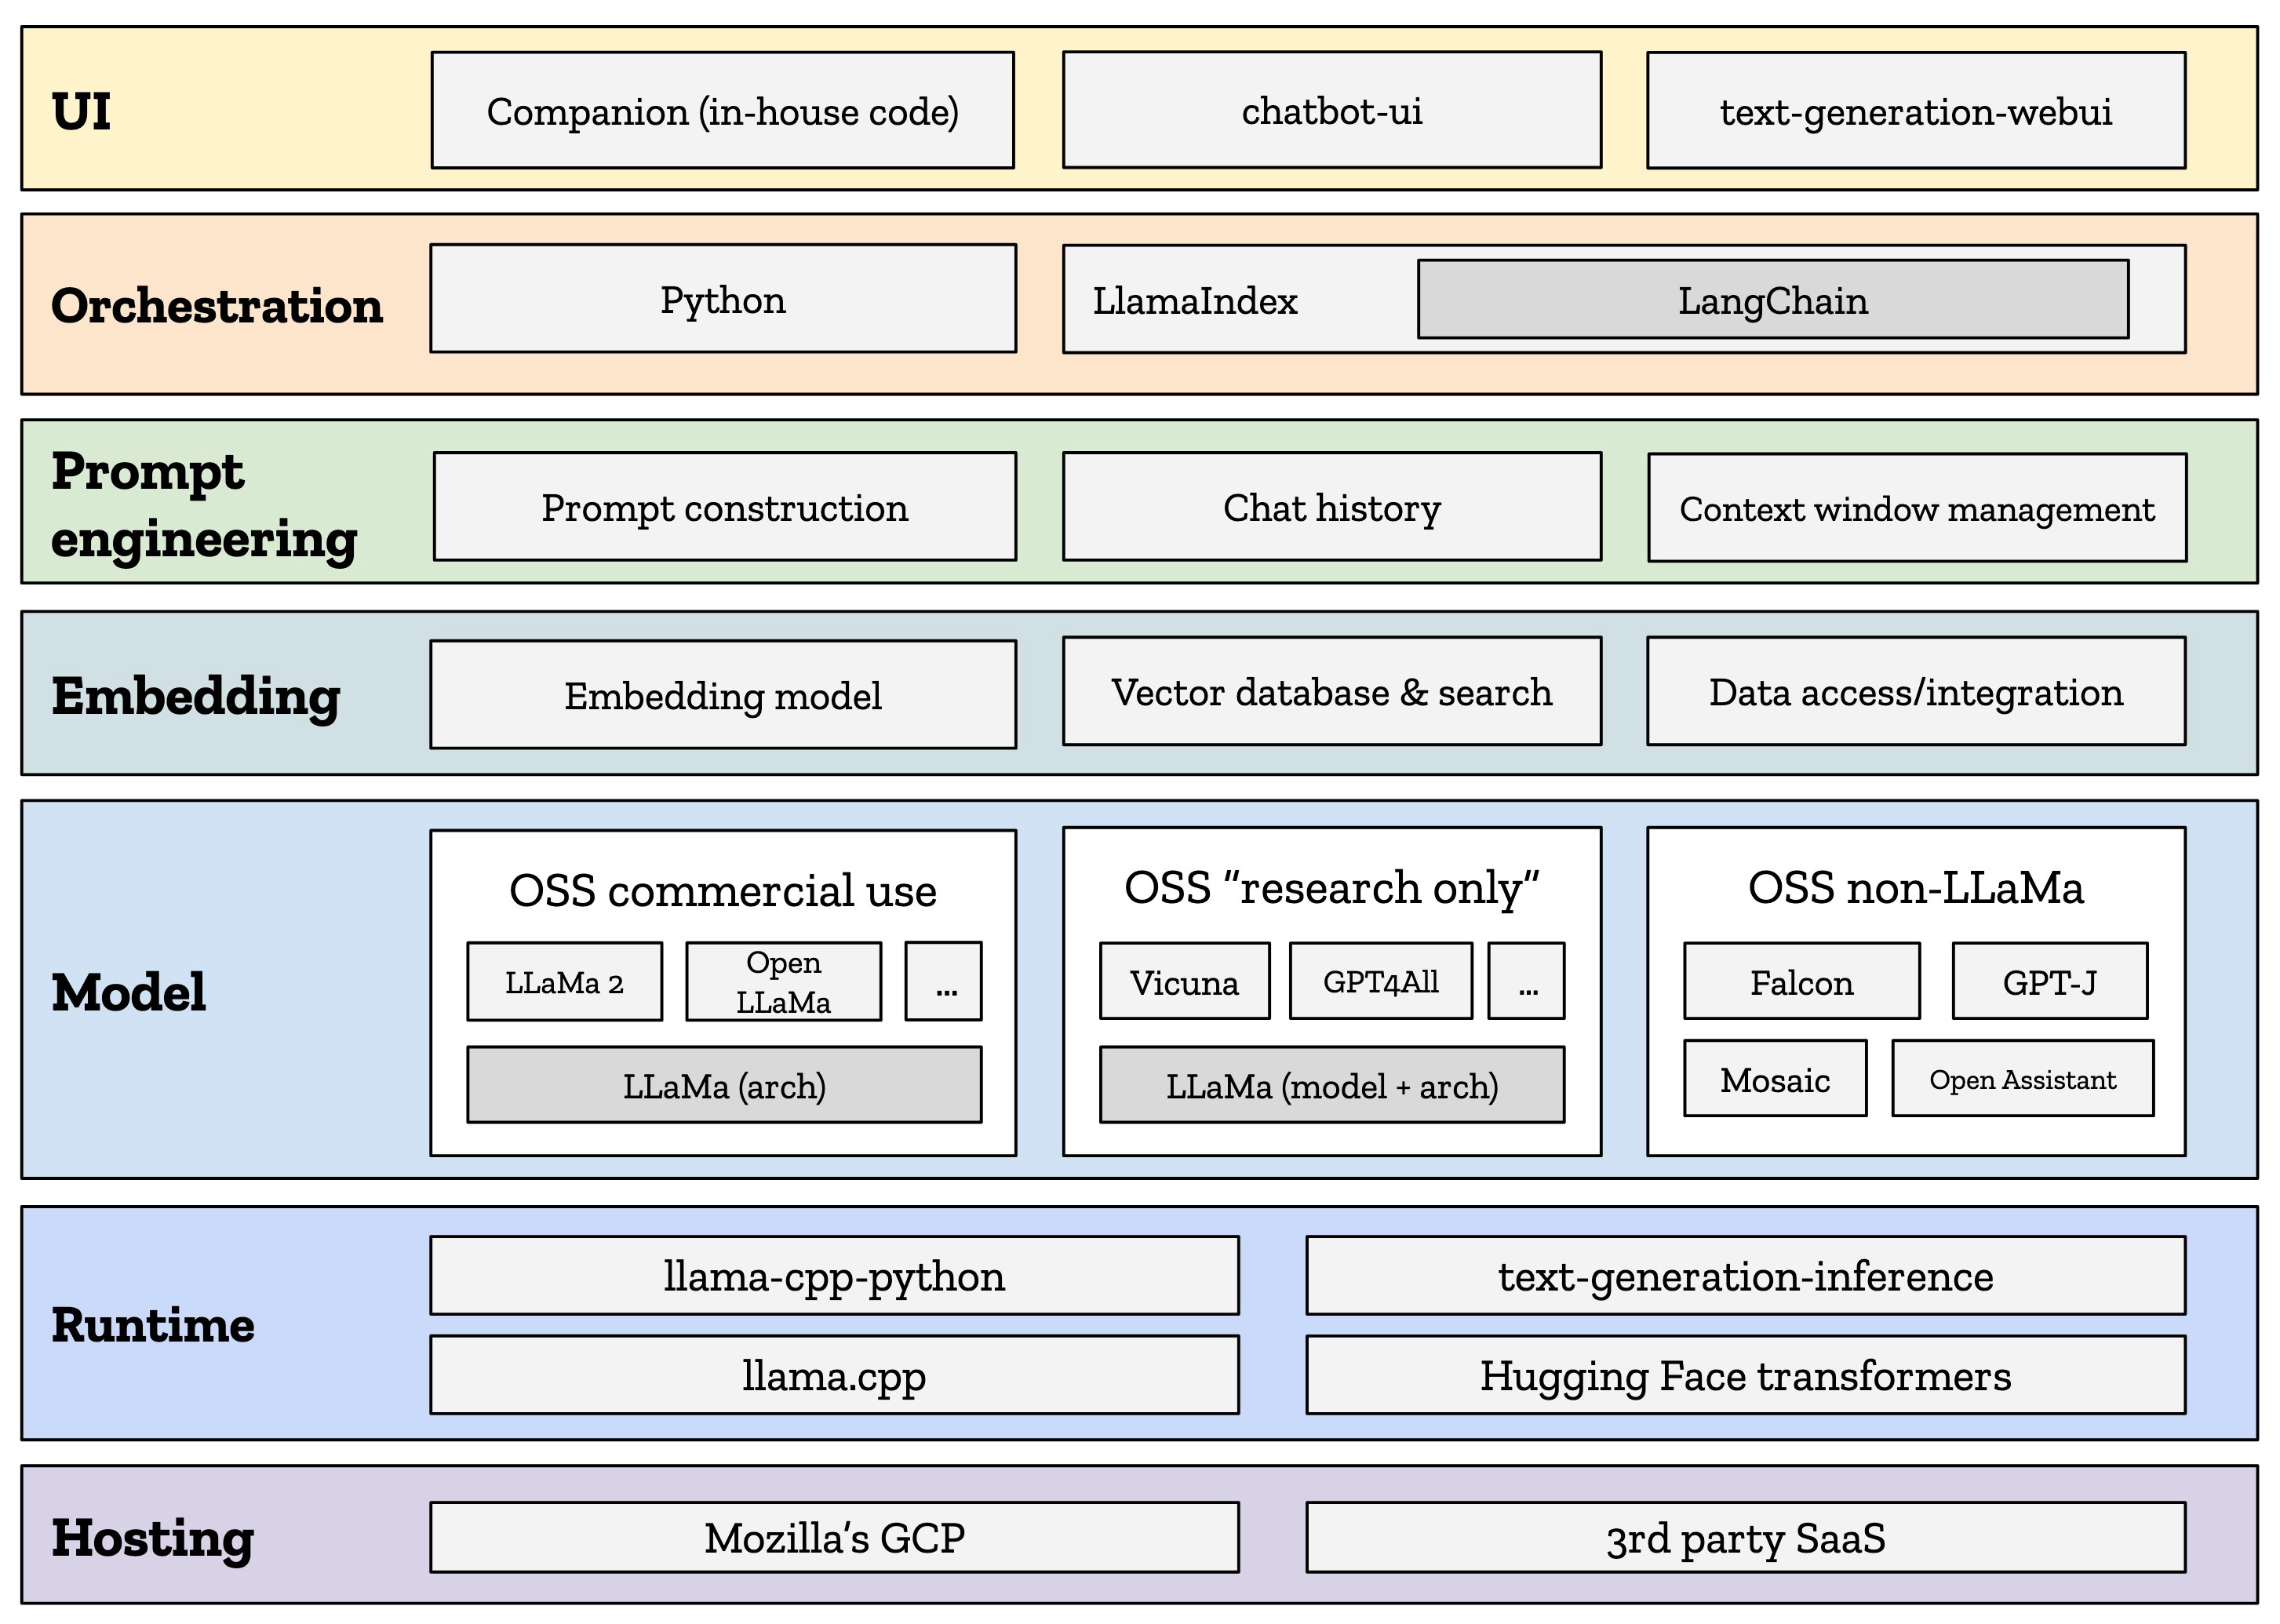
source: So you want to build your own open source chatbot… – Mozilla Hacks
Installing the Python Libraries with pip
pip install langchain[all]
pip install openai
The Two Types of Language Models
There are two types of language models, which in LangChain are called:
LLMs: this is a language model which takes a string as input and returns a string
ChatModels: this is a language model which takes a list of messages as input and returns a message
Calling OpenAI Without a Chain from LangChain
| from langchain.llms import OpenAI
llm = OpenAI(openai_api_key="...")
text = "What would be a good company name for a company that makes colorful socks?"
llm.predict(text)
# >> Feetful of Fun
chat_model.predict(text)
# >> Socks O'Color
|
Chaining Components with LangChain
The chains are a Python class, as demonstrated in this psuedo-code from their docs.
Using an LLM in isolation is fine for simple applications, but more complex applications require chaining LLMs - either with each other or with other components.
LangChain provides the Chain interface for such "chained" applications. We define a Chain very generically as a sequence of calls to components, which can include other chains. The base interface is simple:
- LangChain Documentation, Chains How-To
1
2
3
4
5
6
7
8
9
10
11
12
13 | class Chain(BaseModel, ABC):
"""Base interface that all chains should implement."""
memory: BaseMemory
callbacks: Callbacks
def __call__(
self,
inputs: Any,
return_only_outputs: bool = False,
callbacks: Callbacks = None,
) -> Dict[str, Any]:
...
|
Chaining Open AI Components
1
2
3
4
5
6
7
8
9
10
11
12
13 | from langchain.llms import OpenAI
from langchain.prompts import PromptTemplate
from langchain.chains import LLMChain
llm = OpenAI(temperature=0.9)
prompt = PromptTemplate(
input_variables=["product"],
template="What is a good name for a company that makes {product}?",
)
chain = LLMChain(llm=llm, prompt=prompt)
# Run the chain only specifying the input variable.
print(chain.run("colorful socks"))
# >> Socks O'Color
|
Natural Language Queries with LangChain
These examples are shown in Analyzing Structured Data.
| from langchain.utilities import SQLDatabase
from langchain.llms import OpenAI
from langchain_experimental.sql import SQLDatabaseChain
# The documented examples use a Chinook DB.
db = SQLDatabase.from_uri("sqlite:///Chinook.db")
llm = OpenAI(temperature=0, verbose=True)
db_chain = SQLDatabaseChain.from_llm(llm, db, verbose=True)
db_chain.run("How many employees are there?")
# >>> 'There are 8 employees.'
|
Text to SQL Queries With Ability to Run the Query on the Database
| from langchain.utilities import SQLDatabase
from langchain.chat_models import ChatOpenAI
from langchain.chains import create_sql_query_chain
db = SQLDatabase.from_uri("sqlite:///Chinook.db")
chain = create_sql_query_chain(ChatOpenAI(temperature=0), db)
response = chain.invoke({"question":"How many employees are there"})
print(response)
# >>> 'There are 8 employees.'
|
Use a LangChain Agent to Describe a Database Table
1
2
3
4
5
6
7
8
9
10
11
12
13
14 | from langchain.agents import create_sql_agent
from langchain.agents.agent_toolkits import SQLDatabaseToolkit
# from langchain.agents import AgentExecutor
from langchain.agents.agent_types import AgentType
db = SQLDatabase.from_uri("sqlite:///Chinook.db")
llm = OpenAI(temperature=0, verbose=True)
agent_executor = create_sql_agent(
llm=OpenAI(temperature=0),
toolkit=SQLDatabaseToolkit(db=db, llm=OpenAI(temperature=0)),
verbose=True,
agent_type=AgentType.ZERO_SHOT_REACT_DESCRIPTION,
)
agent_executor.run("Describe the playlisttrack table")
|
Description of Database Table Result
 1
 2
 3
 4
 5
 6
 7
 8
 9
10
11
12
13
14
15
16
17
18
19
20
21
22
23
24
25
26
27 | > Entering new AgentExecutor chain...
Action: sql_db_list_tables
Action Input:
Observation: Album, Artist, Customer, Employee, Genre, Invoice, InvoiceLine, MediaType, Playlist, PlaylistTrack, Track
Thought: The PlaylistTrack table is the most relevant to the question.
Action: sql_db_schema
Action Input: PlaylistTrack
Observation:
CREATE TABLE "PlaylistTrack" (
"PlaylistId" INTEGER NOT NULL,
"TrackId" INTEGER NOT NULL,
PRIMARY KEY ("PlaylistId", "TrackId"),
FOREIGN KEY("TrackId") REFERENCES "Track" ("TrackId"),
FOREIGN KEY("PlaylistId") REFERENCES "Playlist" ("PlaylistId")
)
/*
3 rows from PlaylistTrack table:
PlaylistId TrackId
1 3402
1 3389
1 3390
*/
Thought: I now know the final answer
Final Answer: The PlaylistTrack table contains two columns, PlaylistId and TrackId, which are both integers and form a primary key. It also has two foreign keys, one to the Track table and one to the Playlist table.
> Finished chain.
|
Versatile + Flexible for Your LLM Needs
If you prefer using the Meta's LLaMA model over OpenAI, more power to you. LangChain can do both and many more. At the time of this writing, the following models are documented: Anthropic, Anthropic Functions, Anyscale, Azure, Azure ML Chat Online Interface, Baidu Qianfan, Bedrock Chat, ERNIE-bot Chat, Fireworks, GCP Vertex API, JinaChat, Konko, LiteLLM, Llama API, MiniMax, Ollama, OpenAI, PromptLayer ChatOpenAI and vLLM Chat.
Wrapping Up With LangChain
These examples represent a few things you can do with this popular Python library. You're now a step closer to creating your next AI-infused product or service. No one needs to know it's just a wrapper for OpenAI and LangChain! The library's name makes more sense once you understand a bit of its context as orchestrator. It chains together the pieces of your large language model's parts into a shiny, impressive AI solution.
Read More:
LangChain Documentation, Chains How To
LangChain Documentation, Deployments