Aug 29, 2024
Ubuntu allows aliasing commands to run a shell function. Below, I used
xdg-open to open my Cloudflare Pages
dashboard with an alias.
Add Ubuntu Function to .bashrc
I used VS Code to add this to my .bashrc file. Now, when I type cloudflare
into my shell it launches the dashboard in Chrome. Remember to close and reopen
a new shell before testing out the command.
| open_cloudflare() {
xdg-open "https://dash.cloudflare.com"
}
alias cloudflare=open_cloudflare
|
The pattern of being able to open a page in a web browser with a quick command could
be applied to lots of my frequently visited websites.
Bonus Alternate Version: Python webbrowser Module CLI
Sometimes the right tool is Python. Other times, the Linux shell CLI tools are sufficient.
Since this is a Python blog... here is a version that leverages the
Python webbrowser module CLI that
also works, assuming you're already in your Python environment.
| open_cloudflare() {
python -m webbrowser https://dash.cloudflare.com
}
alias cloudflare=open_cloudflare
|
Aug 12, 2024
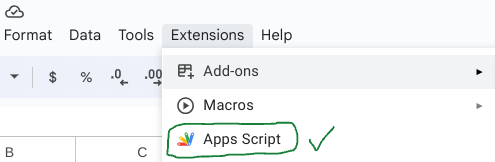
I've been messing around with Apps Script lately
and am finding it useful. The below Apps Script was created with a few prompts to Bing Copilot. First, I asked Bing:
Write a Google sheets formula that copies the value in cell B10 to another sheet and also fills another column with today's date
...and a later prompt:
how can i make this script add a new row each time in the target sheet and appending to existing rows?
I refined with some followup prompts to write a script. It copies cell B10's value
from a sheet then fills in a row in a different sheet with cell B10's value and today's date.
AI allows me to do things that would have taken more time to figure out before. For example,
Bing just tapped the appendRow
function to handle the updating of values without overwriting existing data. We don't need to know the specific
Apps Script functions to write code in a new language anymore. AI can just fill in those details for us.
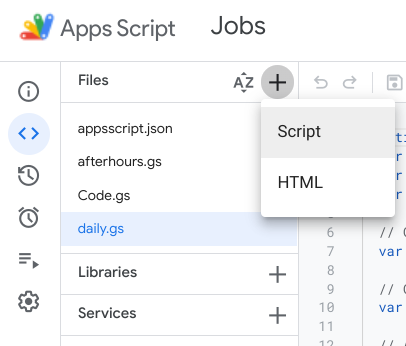
Apps Script to Copy a Cell Value and Create New Row with Today's Date
In this example, one sheet is named "Summary" and the other target sheet is named "Daily"
with 2 column names.
1
2
3
4
5
6
7
8
9
10
11
12
13
14 | function copyTotalValue() {
var ss = SpreadsheetApp.getActiveSpreadsheet();
var sourceSheet = ss.getSheetByName("Summary");
var targetSheet = ss.getSheetByName("Daily");
// Get the value from B10 in Summary
var value = sourceSheet.getRange("B10").getValue();
// Get today's date
var today = new Date();
// Append a new row to the Daily sheet with the value and today's date
targetSheet.appendRow([value, today]);
}
|
According to Bing, Apps Script is a JavaScript dialect:
Google Apps Script is based on JavaScript. It uses a subset of JavaScript and provides additional built-in functions...
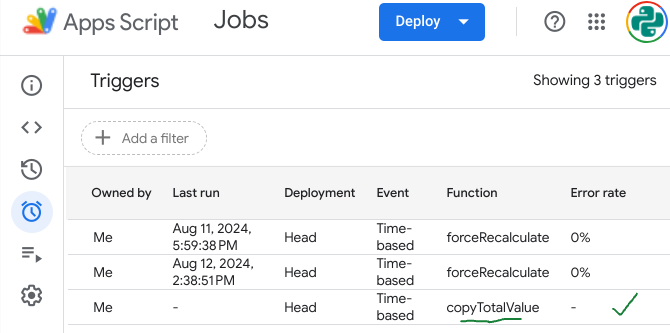
Automate The Script From the Apps Script Jobs Dashboard
Go to the Apps Script Jobs dashboard.
Add a new script to run Apps Script.
Click the blue "Add Trigger" button to create a new job.
Supplementary Reading
Apps Script Reference Overview
Apps Script API
Apps Script Spreadsheet Service
Jul 25, 2024
This post focuses on Google Sheets formulas, rather than Python. If you're interested
in accessing Google Sheets with Python, check out this post I wrote about the pygsheets library.
I haven't personally tried it, but xlwings
also looks like a decent option if you're looking for Google Sheets Python libraries.
Here are some functions I recently discovered to analyze data in Sheets.
There a few different strategies you can use to import data into Google Sheets with the functions available.
Below, you'll see some different approaches you use to get data into Google Sheets and then analyze it.
The Google Sheets formulas rabbit hole is deep. Lots of power can be harnessed by getting familiar with the
formulas it has built-in.
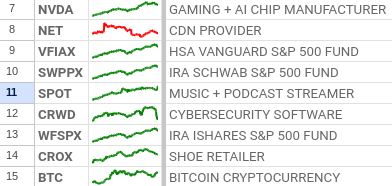
Year To Date SPARKLINE of a Stock
=SPARKLINE(GOOGLEFINANCE("Nasdaq:NVDA", "price", DATE(YEAR(TODAY()), 1, 1), TODAY(), "daily"), {"charttype", "line"; "linewidth", 2; "color", "green"})
Year to Date SPARKLINE of USD to MXN Currency Value with GOOGLEFINANCE + SPARKLINE USING IF to Dynamically Color the SPARKLINE
=SPARKLINE(GOOGLEFINANCE("CURRENCY:USDMXN", "price", TODAY()-365, TODAY(), "DAILY"), {"charttype", "line"; "linewidth", 2; "color", if(A2>0,"green","red")})
Above, we use an if condition to check another cell and set the color to green if > 0 or red if < 0.
Market Cap with GOOOGLEFINANCE
=GOOGLEFINANCE("Nasdaq:NVDA", "marketcap")
Price/Earnings Ratio
=GOOGLEFINANCE("Nasdaq:MSFT", "pe")
Daily % Change of a Stock
=GOOGLEFINANCE("Nasdaq:TSLA","changepct") &"%"
Import the Price of ADA Cryptocurrency with IMPORTDATA
=IMPORTDATA("https://cryptoprices.cc/ADA")
This function imports the price of Cardano cryptocurrency from cryptoprices.cc.
Import the Market Cap of ADA Cryptocurrency with IMPORTDATA
=IMPORTDATA("https://cryptoprices.cc/ADA/MCAP")
This function imports the current market cap of Cardano cryptocurrency.
Import the Daily % Change of Ethereum Cryptocurrency with IMPORTXML and INDEX
=TEXT(
IF(
IMPORTXML("https://coinmarketcap.com/currencies/ethereum/", "//p/@data-change") = "down",
"-" & INDEX(IMPORTXML("https://coinmarketcap.com/currencies/ethereum/", "//p[@data-change]"), 1, 2),
INDEX(IMPORTXML("https://coinmarketcap.com/currencies/ethereum/", "//p[@data-change]"), 1, 2)
),
"0.0%"
)
This method uses IMPORTXML to import data to Google Sheets by passing an "XPath query".
The first line checks if the direction of the % change is "down". If it is down,
then we know the % change is negative, otherwise the % change is positive.
To select the HTML element, I right-clicked the number on the page that I
wanted to import on coinmarketcap and selected "Inspect" to reference the HTML
class names for the paragraph I was targeting.
Conditionally sum a range with SUMIFS, SUMIF and COUNTIF
=SUMIFS('sheet_name'!G:G, 'sheet_name'!N:N, ">0")
In the following examples, "sheet_name" = Your Google sheet's name.
This function sums the corresponding cells in column N if column G contains a number greater than 0.
=SUMIF('sheet_name'!N:N, "Some Value",'sheet_name'!G:G)
This function sums all values in column G if the values in column N are equal to "Some Value".
=COUNTIF('sheet_name'!A:A, "Some Value")
Count all the cells in column A that equal "Some Value".
Select Columns from a Dataset
{ 'sheet_name'!A:D, 'sheet_name'!T:X, 'sheet_name'!Z:AA}
Google Sheets recognizes this format of bracket enclosed ranges of columns to select into your dataset.
In the next example, you can see this applied.
Conditionally Select a Range of Cells from a Dataset with SORTN, FILTER, and REGEXMATCH
=SORTN(FILTER({'sheet_name'!A:A, 'sheet_name'!E:E, 'sheet_name'!P:P/1,'sheet_name'!F:F}, REGEXMATCH('sheet_name'!P:P, "-")), 5, 0, 3, TRUE)
This formula constructs a dataset, then filters it on a condition using REGEXMATCH to check if the cell contains a hyphen (-).
5 specifies how many rows to return, and 3 specifies which column to sort on, in this case the 3rd column.
Conditionally Select a Range of Cells from a Dataset with SORTN and QUERY with SQL-Like Language
=SORTN(QUERY({'sheet_name'!A:A, 'sheet_name'!E:E, 'sheet_name'!P:P,'sheet_name'!F:F}, "SELECT * WHERE Col3 IS NOT NULL"), 6, 0, 3, FALSE)
This queries rows that are not null, containing data.
Official Function Documentation
Google Sheets Function List
GOOGLEFINANCE
IMPORTDATA
IMPORTXML
SPARKLINE
FILTER
SUMIFS
QUERY
SORTN
INDEX
REGEXMATCH
Jun 25, 2024
While walking down a busy avenue in Mexico, I listened to a conversation in Spanish. I'm not fluent in Spanish,
but I have 4 years of high school classes and ~2 more years of real world experience. Spanish is not spoke in a bubble.
It needs to be practiced to be learned. I put much effort into listening. There is much more I have to learn. Typically,
I try to compensate for some lack of skills with intense focus. Sometimes I know what is said and more often
I am closer to guessing.
On this walk down the street, I attempted to listen to my friends speak. In the back of my mind, I was frustrated
because the noise of the cars going past us and a city in motion made it near impossible to hear the words. Similarly, attempting
to listen in a bar, party or anywhere playing music is very tough.
I used to think, "if only it was more quiet!" while walking and straining to hear what my friends said over the noise.
Today I had an epiphany: there's always background noise.
A difference between textbooks and real life: there's usually noise in the background.
We should embrace practicing and growing our skills because there will always be "noise".
This is a tidy metaphor for distraction and our focus bandwidth. In the lens of coding, the "noise" might be
skill deficiencies and lack of understanding, other co-workers, unimportant projects, meetings, social media, games
and anything that misdirects us away from our primary goals.
It's easy to get annoyed when there is excessive noise. It makes it way harder to hear what is being said.
Nonetheless, I don't have to let the noise distract my effort and intention to learn. So it is with programming and all skills.
There will always be "noise". Embrace the noise and lean heavily on your intention to practice.

Image Generated with Bing Image Creator
May 01, 2024
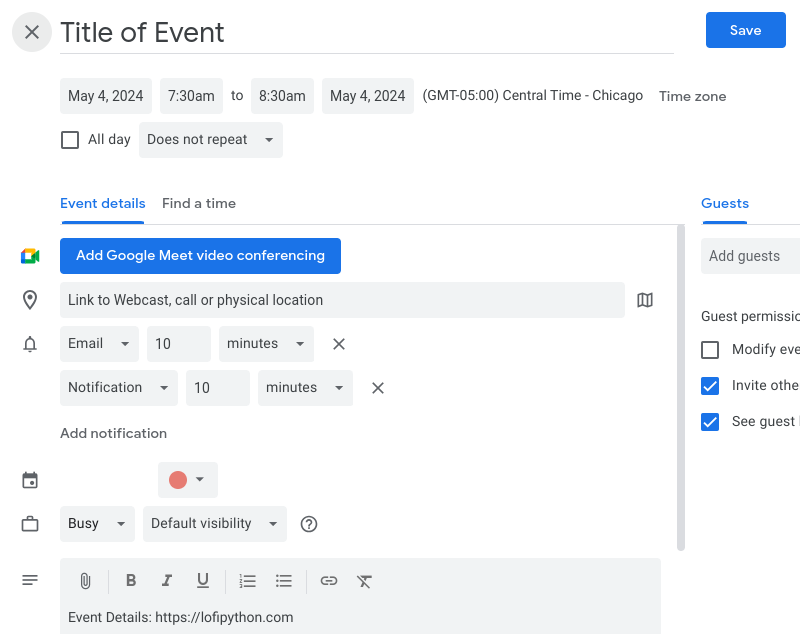
You can easily share a Google Calendar event if you know the url syntax Google uses.
When the url is opened in a browser, it prompts the person you want to share an event
with to save it to their calendar.
Demonstrating Google Calendar URL Arguments in Python
By simply knowing the proper url arguments, you can enable people to quickly save a Google Calendar event.
This example uses the Python standard library: urllib to format the Google calendar url parameters and webbrowser
to open the url in a browser. This is a handy little trick to keep in your back pocket!
1
2
3
4
5
6
7
8
9
10
11
12
13
14
15
16
17
18
19
20
21
22
23
24
25
26
27
28
29
30
31
32
33
34
35
36
37
38 | from urllib.parse import urlencode
import webbrowser
def new_google_calendar_event():
"""
Pass an event to Google Calendar with url arguments.
Base URL: https://calendar.google.com/calendar/render
URL Arguments:
action: TEMPLATE
text: Event Title
dates: start_datetime/end_datetime
details: event description or link to more info
location: url to webcast, call or physical location name
ctz: set the time zone by name, ex: America/New_York
recur: set a recurring event, ex: RRULE:FREQ%3DWEEKLY;INTERVAL%3D3
crm: if Free, Busy, or Out of Office, ex: AVAILABLE, BUSY or BLOCKING
add: add a list of guests by email, ex: [email protected],[email protected]
"""
parameters = {
"action": "TEMPLATE",
"text": "Title of Event",
"dates": "20240504T123000Z/20240504T133000Z",
"details": "Event Details: https://lofipython.com",
"location": "link to webcast, call or physical location",
"ctz": "America/Chicago",
"crm": "BUSY"
}
# Returns str of URL encoded parameters.
url_parameters = urlencode(parameters)
url = f"https://calendar.google.com/calendar/render?{url_parameters}"
print(url)
return url
url = new_google_calendar_event()
webbrowser.open_new(url)
|
I was struggling to find any official documentation, so I figured Google's Gemini AI model might know where this is documented.
Using the app on my phone, Gemini informed me of a useful Google Calendar Help thread response from Neil@GCalTools.
- The official documentation says to use "https://calendar.google.com/calendar/render" instead of "https://calendar.google.com/calendar/event", but they both work, at least for now.
- - Neil@GCalTools, Google Calendar Help
Relevant Links
Read more documentation of possible url arguments in the add-event-to-calendar-docs Github repo.
Wikipedia Time Zone List
Recurrence Rule Syntax
Kalinka Google Calendar Link Generator
Apr 07, 2024
Back in 2016, I built a web2py app
as my first web application. It accepts a prompt from the user and
primitively attempts to match that text to a line of Kevin Parker's lyrics written for the band Tame Impala.
I didn't look at the app's code for many years. I just needed to log into PythonAnywhere
every 3 months and hit a button to keep it running on their free plan. Until I decided to update it recently.
Tame Impala released a new album and lots of additional tracks to import to the app.
Just need to update the database with new music. No big deal, right?
Part of the problem with updating the app was that I didn't remember where the important code
like the controller default.py and relevant HTML files were after not seeing it for 5+ years.
It took some time to remember the folder structure of a web2py project. Since it was my first
project ever, documentation was nonexistent. I could have saved myself a lot of grief if I'd wrote
down some notes when I made the app.
web2py is relatively easy to grasp for Python developers. One thing I like is that
once it is installed, the development server is easily started by running the web2py.py file:
cd web2py
python3.10 web2py.py
web2py Python Errors Solved
I installed web2py locally with the help of a DigitalOcean blog post.
After I failed to push a new version of the app to production, for some reasons it was in a broken state.
Python version issues surfaced, requiring some heady navigation. Enjoy these gritty details
of the tracebacks that transpired.
ModuleNotFoundError: No module named 'formatter'
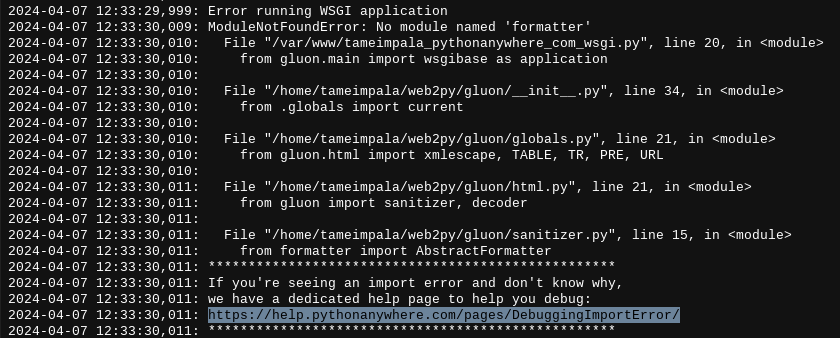
This error showed up in my app's WSGI error logs. Initially, I researched and attempted to install
the formatter module. I believe this was caused by attempting
to run Python code compiled to a .w2p file on Python 3.11 on a Python 3.10 interpreter. However, I didn't
know how to solve it until after I saw the next error.
SystemError: compiled code is incompatible
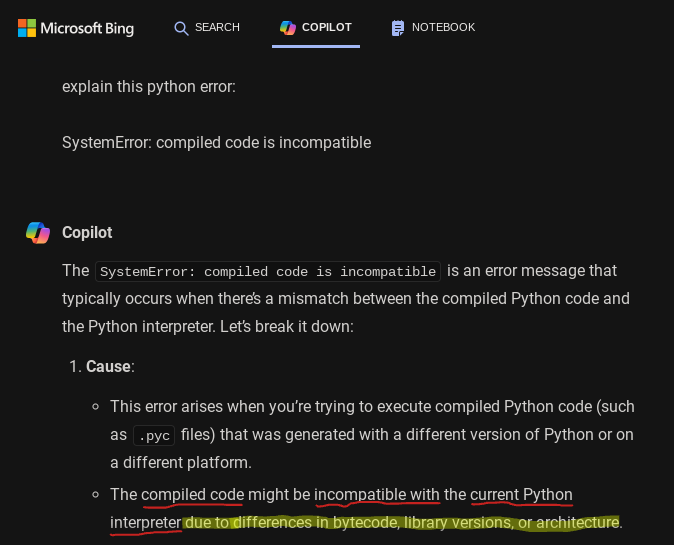
After reading this error, I consulted Bing about it. One of the options that Bing suggested was
that my Python code had incompatible versions. This was caused by a mismatch between my development
and production Python versions.
Installing Python 3.10 in Development Environment
Originally, I compiled the updated web2py app in Python 3.11 on my Chromebook. My PythonAnywhere environment was
running Python 3.10. Therefore, I need to build the
development code in Python 3.10 to match the production environment on PythonAnywhere.
I entered a handful of commands from Bing Copilot to build Python 3.10 on my Ubuntu development environment:
sudo apt-get install build-essential
sudo apt-get install zlib1g-dev
sudo apt-get install libsqlite3-dev
wget https://www.python.org/ftp/python/3.10.5/Python-3.10.5.tgz
tar zxvf Python-3.10.5.tgz
cd Python-3.10.5
./configure --enable-optimizations --enable-loadable-sqlite-extensions
make && sudo make install
The lesson I took away is to consider your production environment's Python version before you begin working on a project.
In most cases, you'll want to match that version in your development environment to avoid errors like this.
After compiling the new development Python 3.10 version, I exported the app to a new .w2p file.
Next, I imported the .w2p file containing the updated app to PythonAnywhere in the admin interface app importer.
After syncing my development and production environment versions, the app showed a different error.
Progress!
Since I was using a .w2p file from 5+ years ago, it contained old Python web2py code written in
earlier Python versions with a few more bugs. Despite these version inconveniences, I was happy to see the
"compiled code is incompatible" and "formatter module missing" errors stopped.
One problem solved, two more discovered in its wake, am I right?
SyntaxError: multiple exception types must be parenthesized
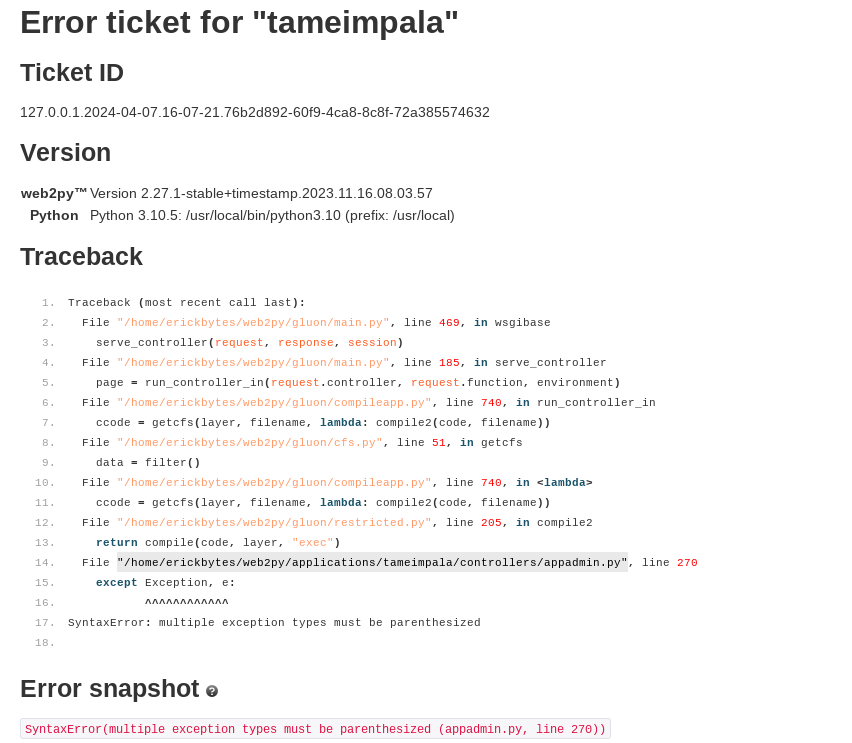
This error showed up in my appadmin.py. At some point this unparenthesized syntax was phased out of Python.
The fix is add parentheses to the exception statements:
Incorrect
Correct
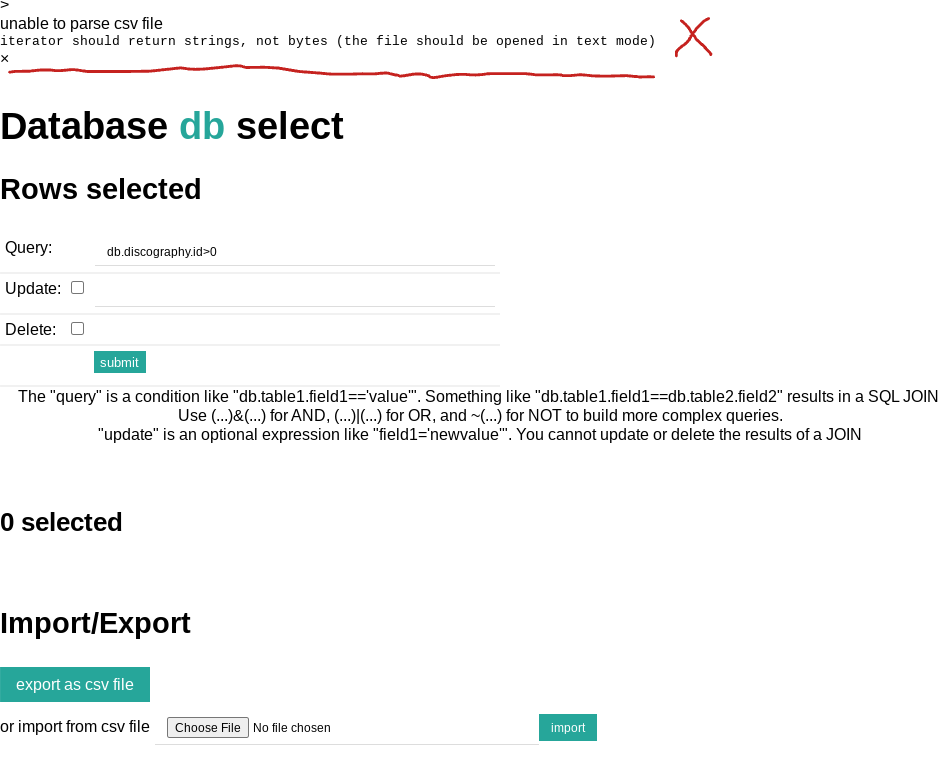
unable to parse csv file: iterator should return strings, not bytes (the file should be opened in text mode)
In order to import the new Tame Impala songs to the SQLlite database, web2py provides a
GUI interface in its admin panel or the DAL (Database Abstraction Layer).
I chose to use the GUI. In the GUI, you can either manually enter each song or use its csv import widget.
To save time, I imported via the csv widget. However, this error slowed me down.
It stemmed from the need for TextIOWrapper to convert the csv data to a required format.
The solution I found was to use the
fix suggested by AnooshaAviligonda.
In web2py/gluon/packages/dal/pydal/objects.py, I swapped in this code:
| csv_reader = csv.reader(TextIOWrapper(utf8_data,encoding), dialect=dialect, **kwargs)
|

After adding the above code to my web2py app's objects.py file, the csv importer completed my
new Tame Impala songs database import. Also, I was able to export an app from my development environment
and deploy it into PythonAnywhere via the admin interface. Mission accomplished.
I imported the new songs to my app and brought the code forward into future Python versions.
Keeping up with this project over the years shows how maintaining an app across different Python versions
can cause unexpected challenges. With these Python tracebacks conquered, the app is back on the web.
Now with all of Tame Impala's new lyrics!
Check out my Tame Impala web2py app here:
tameimpala.pythonanywhere.com/tameimpala
Mar 31, 2024
This post shows how to set up a custom Django template tag filter. With help from Django's load built-in,
you can execute a Python function from your app's HTML. In this example, the function returns the quotient,
or result of dividing two numbers. Mathematics and Python for the win!
I worked some of this out with help from Bing and
following along with the Django custom template tags documentation.
Install Django Python Library
pip install Django
Create templatetags.py
I created a "templatetags" folder in the app folder and placed templatetags.py within it.
The Django docs recommend your app's folder. Below, the @register.filter decorator registers the divide function so Django knows it exists.
 1
 2
 3
 4
 5
 6
 7
 8
 9
10
11
12
13
14
15
16
17 | from django import template
register = template.Library()
@register.filter
def divide(value, divisor):
"""A Django filter that accepts 2 arguments:
1. value, number to be divided
2. divisor, number to divide by
Returns the quotient in hundredths decimal format.
"""
# Check if the argument is zero to avoid division by zero error.
if divisor == 0:
return None
quotient = value / divisor
return f"{quotient:.2f}"
|
Edit Your HTML Code to Call the Divide Function
 1
 2
 3
 4
 5
 6
 7
 8
 9
10
11
12
13 | {% extends 'base.html' %}
{% block content %}
{% load templatetags %}
<div class="container" style="display: inline-block; inline-size: 90%; block-size: auto; writing-mode: horizontal-tb;">
{% for hotel in hotels %}
<div class="row row-cols-3" style="display: flex; justify-content: flex-end; padding: 10px; margin: 10px; background-color: #f0ffff; box-shadow: 5px 5px 10px gray; border-radius: 10px;">
<div class="col">
<h5 style="color: green;">Peso: ${{ hotel.price }}</h5>
<h5 style="color: gray;">USD: ${{ hotel.price|divide:18.9 }}</h5>
</div></div>
{% endfor %}
</div>
{% endblock %}
|
In the HTML, call the divide function by loading the templatetags module and then passing two numeric arguments:
{{ hotel.price|divide:18.9 }}
- A number to be divided, here the hotel price from a "Hotel" DB model
- The function name to call and a number to divide by. Here we use "divide:18.9" to approximately convert Mexican pesos to US dollars. Recently, the exchange rate fluctuates in the 17-19 pesos per dollar range.
Basic Hotel Model Example
| from django.db import models
class Hotel(models.Model):
name = models.CharField(max_length=200)
price = models.DecimalField(max_digits=10, decimal_places=2)
address = models.CharField(max_length=200)
city = models.CharField(max_length=200)
all_inclusive = models.BooleanField()
photo = models.ImageField(upload_to="media")
|
Register Model in admin.py
| from django.contrib import admin
from .models import Hotel
admin.site.register(Hotel)
|
I was pleased to be able to make some on the fly mathematic calculations in my HTML
with a custom Django filter!

Mar 01, 2024
The posts on this blog are written in reStructuredText.
I recently had an idea to write a Python script to check my .rst document url links for broken tags or urls that are not valid.
When I'm using Pelican, it hints when a url tag is malformed and gives a line number.
However, it can still be difficult to track down a problematic link when there's an issue in your document.
So I did what any other programmer probably does in 2024, opened up an AI assistant. Bing quickly generated the structure
of the Python script from my prompt, but like usual it required some tinkering and refinement to make it work.
You can find the complete Python script in the rst-url-validator Github repo.
Bing was also valuable for helping me modify the regex module code
for rst-url-validator. It is typically very confusing to reason about regex,
but with AI assistance I can just ask it for regex that does something and
the AI can generate the code. Coding is getting way easier than it used to be thanks
to these new advances in large language models.
Install Python Library Dependencies
The script uses requests to send an HTTP request to the url
and rich to print color-coded output to the terminal screen.
pip install requests
pip install rich
Clone The Github Repo
git clone git@github.com:erickbytes/rst-url-validator.git
cd rst-url-validator
Run The CLI Command
python rst-url-validator.py your_file.rst
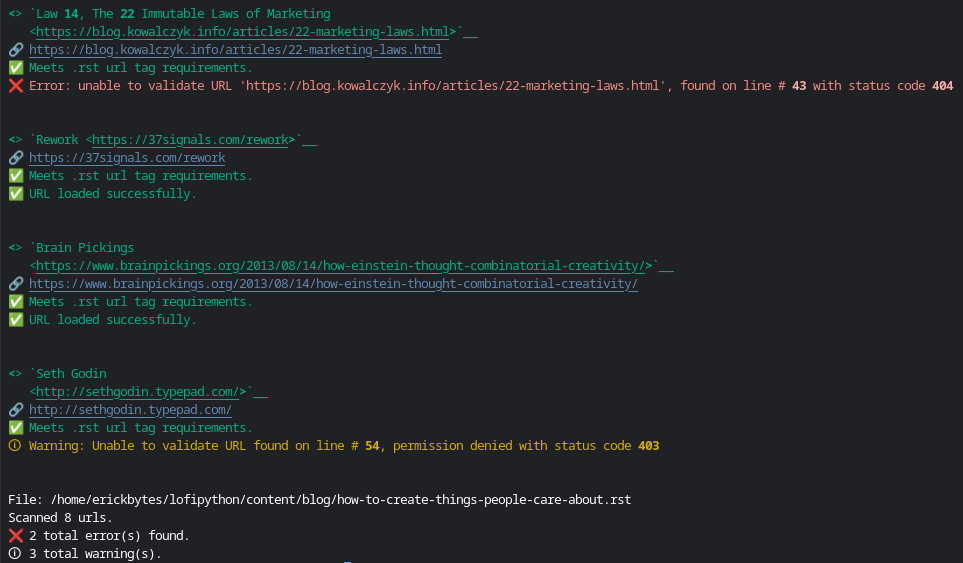
It parses each url tag, checks for required characters and sends a HEAD request
to the url to check if it loads successfully. Some websites return status codes like 403 (permission denied), 301 (redirect), or 404 (page not found).
If the status code returned is 200, it's safe to say the page loaded. Be aware that some sites like Cloudflare (returns 403) and Amazon (returns 503) do not serve
any requests and just return an error. In cases like these, you'll need to check pages like this manually in a browser to see if the page loads.
This script helped me find and fix or remove a bunch of broken links on the older posts on this blog. If you're working with .rst documents, give it a try!
Feb 22, 2024
When booting up the Ubuntu shell on my Chromebook, it usually just works. However, After I updated
to a new version of Chromebook OS, I was getting this error:
- vmshell failed:
- Error starting crostini for terminal:
- 52 (INSTALL_IMAGE_LOADER_TIMED_OUT)
First, I restarted my Chromebook but the error persisted after restarting. So I turned to Bing Copilot:
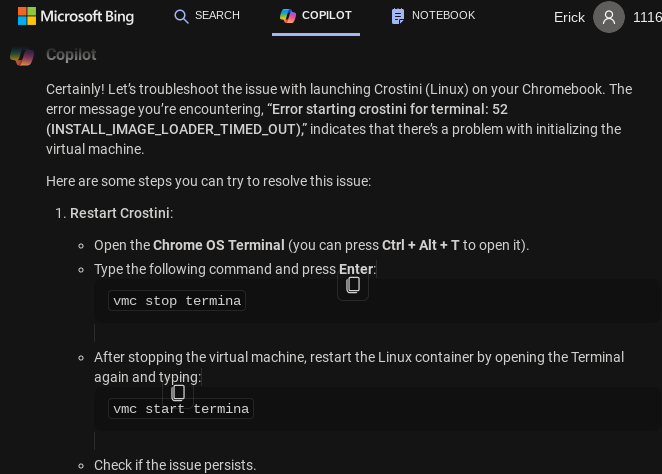
source: Bing
Open Crosh: ctrl + alt + T
Stop The Termina Container in Crosh
vmc stop termina
Start The Termina Container in Crosh
vmc start termina
The vmc command is used to manage Linux containers from Crosh. After I entered these two vmc commands,
the error was resolved. My Crostini Linux shell is functional again!
Feb 21, 2024
After discovering Webmentions via a helpful blog post about sending webmentions,
I wondered how I might be able to achieve sending and receiving them from my Pelican blog. I discovered the
Webmention Rocks! website and the Webmention Protocol.
Webmentions are a standard for sending notification of linkbacks, likes, comments and pingbacks via HTTP.
For example, if your blog is hosted on Wordpress these things are likely all set up for you.
Supporting this recommended standard requires a more creative approach on a static site.
Naturally, I'm now thinking about how I will automate this on my Pelican blog. There are also existing
Python modules like ronkyuu and the
indieweb-utils modules for supporting the
Webmention protocol in Python. However, a static site generator presents challenges for automatically
executing code to send webmentions. Another option may be to use something like Cloudflare Workers
since this blog is hosted on Cloudflare's free plan. Possibly, I could set a worker to trigger and
run some javascript everytime I add a new post. I'm thinking using an existing pelican plugin would
likely be easier than that.
Thankfully, there are some existing Pelican plugins to enable webmentions.
I'm currently testing the pelican-webmention plugin
but have not yet verified if it is actually sending the webmentions. Alternatively, the
linkbacks plugin is an option for supporting Webmentions
on a Pelican blog. Bridgy is another tool written
in Python as a "bridge" for social networks to webmentions. There are a lot of interesting options
for piecing together a Webmention implementation, which is essentially automating an HTTP request you send
when you link to someone else from your website.
In the interim until an automated solution is found I decided to attempt passing the
Webmention Rocks! Update test with curl. Often I find when HTTP requests are required, I can better
understand it by manually making the requests with curl or Python. Once I have a better grasp
after succeeding with curl, it's a little easier to grasp automating the sending of the HTTP requests
with Python or other means.
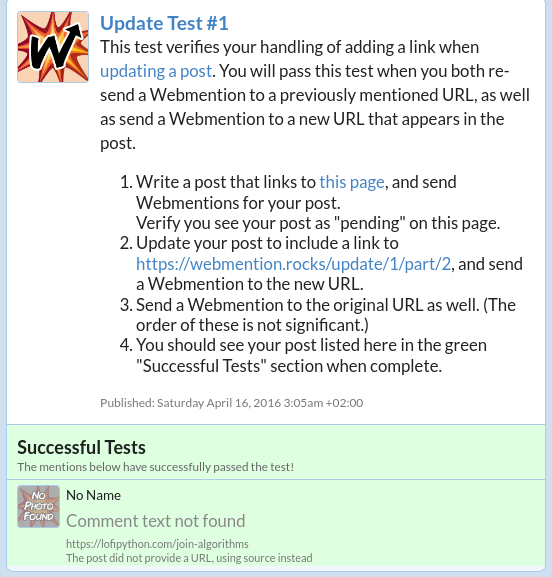
Completing the Webmention Rocks! Update Test #1 With curl
Add a URL Link to Your Blog HTML, AKA The "Webmention"
<a href="https://webmention.rocks/update/1">Part 1 Test</a>
Check Target HTML for Webmention Endpoint with Curl
curl -i -s $target | grep 'rel="webmention"'
Alternative Browser Option: "View Page Source" to Find Webmention Endpoint
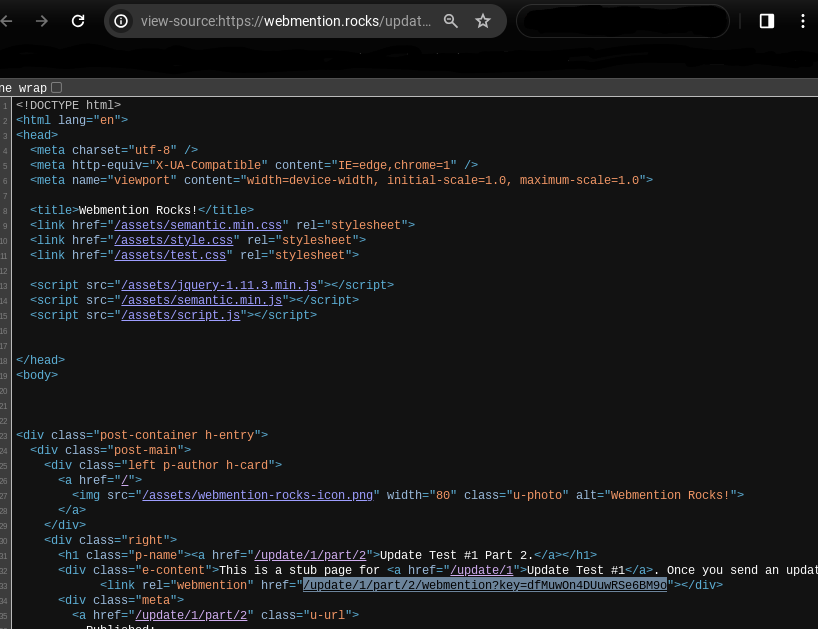
Go to the page you want to check for a Webmention endpoint. Right-click anywhere on the page
and select "View Page Source" to view the website's HTML. Then, right-click the endpoint url
and select "Copy Link Address" to copy the full url of the endpoint.
Send a curl Request Notify the Target Site of Webmention Update
curl -X POST -H "Content-Type: application/x-www-form-urlencoded" -d "source=https://yourblog.com/example-post&target=https://webmention.rocks/update/1" https://webmention.rocks/update/1/part/1/webmention?key=UjJPJoDWZateFb7bTAhB -v
In the curl request, edit the "source" with your blog post containing the link and "target"
with the target Webmention endpoint. You'll need to change the "key" url argument. The Webmention Rocks!
endpoint changes the live key rapidly, about every 30 seconds. In curl, you can pass the -v argument
for more verbose output.
Add URL Link to HTML for Part 2 of the Test
<a href="https://webmention.rocks/update/1/part/2">Part 2 Test</a>
Complete Part 2 of the Test with curl
curl -X POST -H "Content-Type: application/x-www-form-urlencoded" -d "source=https://yourblog.com/example-post&target=https://webmention.rocks/update/1" https://webmention.rocks/update/1/part/2/webmention?key=dfMuwOn4DUuwRSe6BM9o -v
Webmention Update Test Succeeded Confirmation
Check for a Webmention Endpoint and Send the Request in a Bash One-Liner
curl -i -d "source=$your_url&target=$target_url" `curl -i -s $target_url | grep 'rel="http://webmention.org/"' | sed 's/rel="webmention"//' | grep -o -E 'https?://[^ ">]+' | sort | uniq`
source: https://indieweb.org/webmention-implementation-guide
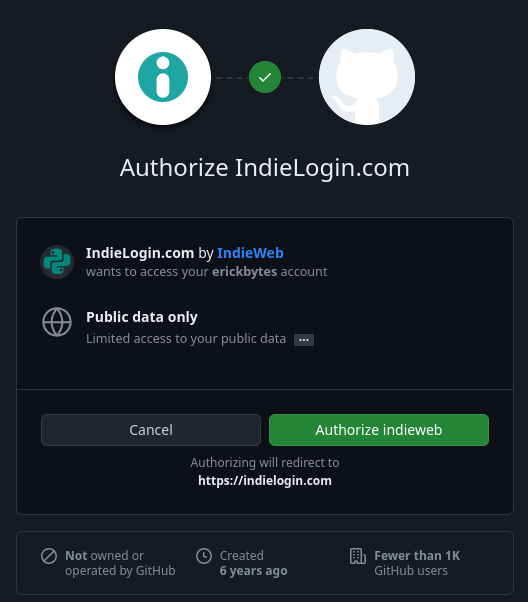
Setting Up Your Blog's Webmentions Endpoint With webmention.io
Webmention.io is a free service to set up your own Webmention endpoint so other people can send
you Webmentions. I chose to authenticate with Github. There are also options to authenticate
via email and other ways. If you choose to authenticate with Github, make sure the url
of your website is in your Github profile.
Add Github HTML Link to Your Website
First, add the Github HTML link to your website identify yourself to webmention.io.
<link href="https://github.com/your_username" rel="me">
Go to Webmention.io to Authorize Indie Login to Your Github Account
Once you successfully connect your Github account to webmention.io, you can copy your HTML code
from the webmention.io dashboard to your website HTML:
<link rel="webmention" href="https://webmention.io/yourblog.com/webmention" />
With an active endpoint linked in your website HTML, you're able to receive webmentions from
the Webmention.io dashboard or with curl.
View Webmentions for Your Blog with curl
curl -X GET https://webmention.io/api/mentions.jf2?target=https://exampleblog.com
Happy webmentioning!
Read More About Webmentions
Webmention Wiki
Webmention.io Github
Webmention.Rocks
Sending Your First Webmention Guide