Passing the Webmention Rocks! Webmention Update Test With curl and Setting Up a Webmention.io Endpoint
After discovering Webmentions via a helpful blog post about sending webmentions, I wondered how I might be able to achieve sending and receiving them from my Pelican blog. I discovered the Webmention Rocks! website and the Webmention Protocol. Webmentions are a standard for sending notification of linkbacks, likes, comments and pingbacks via HTTP. For example, if your blog is hosted on Wordpress these things are likely all set up for you. Supporting this recommended standard requires a more creative approach on a static site.
Naturally, I'm now thinking about how I will automate this on my Pelican blog. There are also existing Python modules like ronkyuu and the indieweb-utils modules for supporting the Webmention protocol in Python. However, a static site generator presents challenges for automatically executing code to send webmentions. Another option may be to use something like Cloudflare Workers since this blog is hosted on Cloudflare's free plan. Possibly, I could set a worker to trigger and run some javascript everytime I add a new post. I'm thinking using an existing pelican plugin would likely be easier than that.
Thankfully, there are some existing Pelican plugins to enable webmentions. I'm currently testing the pelican-webmention plugin but have not yet verified if it is actually sending the webmentions. Alternatively, the linkbacks plugin is an option for supporting Webmentions on a Pelican blog. Bridgy is another tool written in Python as a "bridge" for social networks to webmentions. There are a lot of interesting options for piecing together a Webmention implementation, which is essentially automating an HTTP request you send when you link to someone else from your website.
In the interim until an automated solution is found I decided to attempt passing the Webmention Rocks! Update test with curl. Often I find when HTTP requests are required, I can better understand it by manually making the requests with curl or Python. Once I have a better grasp after succeeding with curl, it's a little easier to grasp automating the sending of the HTTP requests with Python or other means.
Completing the Webmention Rocks! Update Test #1 With curl
Add a URL Link to Your Blog HTML, AKA The "Webmention"
<a href="https://webmention.rocks/update/1">Part 1 Test</a>
Check Target HTML for Webmention Endpoint with Curl
curl -i -s $target | grep 'rel="webmention"'
Alternative Browser Option: "View Page Source" to Find Webmention Endpoint
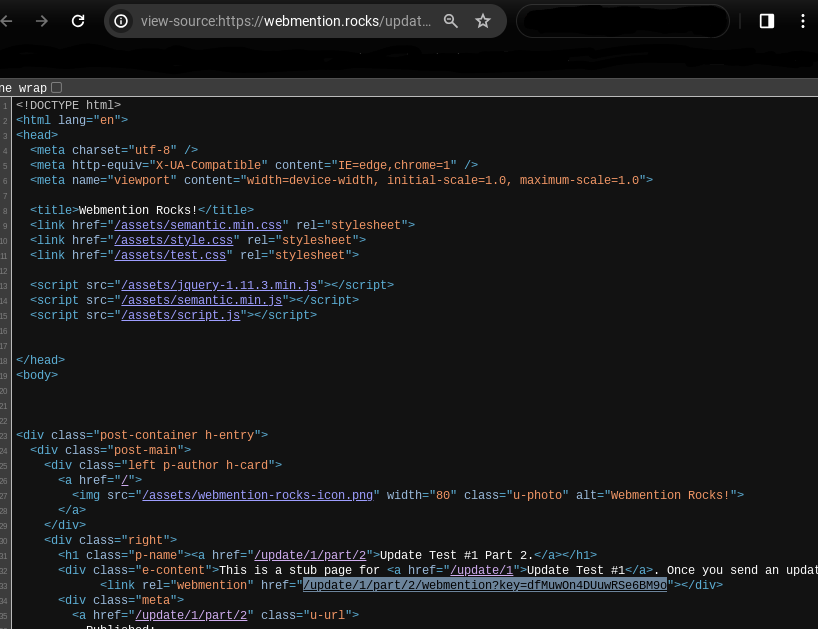
Go to the page you want to check for a Webmention endpoint. Right-click anywhere on the page and select "View Page Source" to view the website's HTML. Then, right-click the endpoint url and select "Copy Link Address" to copy the full url of the endpoint.
Send a curl Request Notify the Target Site of Webmention Update
curl -X POST -H "Content-Type: application/x-www-form-urlencoded" -d "source=https://yourblog.com/example-post&target=https://webmention.rocks/update/1" https://webmention.rocks/update/1/part/1/webmention?key=UjJPJoDWZateFb7bTAhB -v
In the curl request, edit the "source" with your blog post containing the link and "target" with the target Webmention endpoint. You'll need to change the "key" url argument. The Webmention Rocks! endpoint changes the live key rapidly, about every 30 seconds. In curl, you can pass the -v argument for more verbose output.
Add URL Link to HTML for Part 2 of the Test
<a href="https://webmention.rocks/update/1/part/2">Part 2 Test</a>
Complete Part 2 of the Test with curl
curl -X POST -H "Content-Type: application/x-www-form-urlencoded" -d "source=https://yourblog.com/example-post&target=https://webmention.rocks/update/1" https://webmention.rocks/update/1/part/2/webmention?key=dfMuwOn4DUuwRSe6BM9o -v
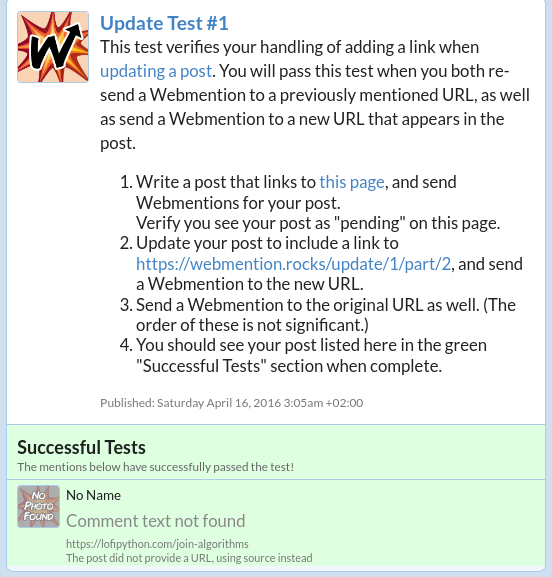
Webmention Update Test Succeeded Confirmation
Check for a Webmention Endpoint and Send the Request in a Bash One-Liner
curl -i -d "source=$your_url&target=$target_url" `curl -i -s $target_url | grep 'rel="http://webmention.org/"' | sed 's/rel="webmention"//' | grep -o -E 'https?://[^ ">]+' | sort | uniq`
source: https://indieweb.org/webmention-implementation-guide
Setting Up Your Blog's Webmentions Endpoint With webmention.io
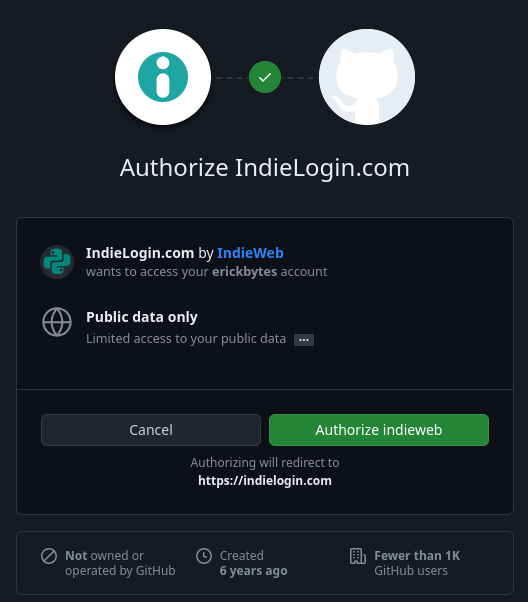
Webmention.io is a free service to set up your own Webmention endpoint so other people can send you Webmentions. I chose to authenticate with Github. There are also options to authenticate via email and other ways. If you choose to authenticate with Github, make sure the url of your website is in your Github profile.
Add Github HTML Link to Your Website
First, add the Github HTML link to your website identify yourself to webmention.io.
<link href="https://github.com/your_username" rel="me">
Go to Webmention.io to Authorize Indie Login to Your Github Account
Once you successfully connect your Github account to webmention.io, you can copy your HTML code from the webmention.io dashboard to your website HTML:
<link rel="webmention" href="https://webmention.io/yourblog.com/webmention" />
With an active endpoint linked in your website HTML, you're able to receive webmentions from the Webmention.io dashboard or with curl.
View Webmentions for Your Blog with curl
curl -X GET https://webmention.io/api/mentions.jf2?target=https://exampleblog.com
Happy webmentioning!
Read More About Webmentions